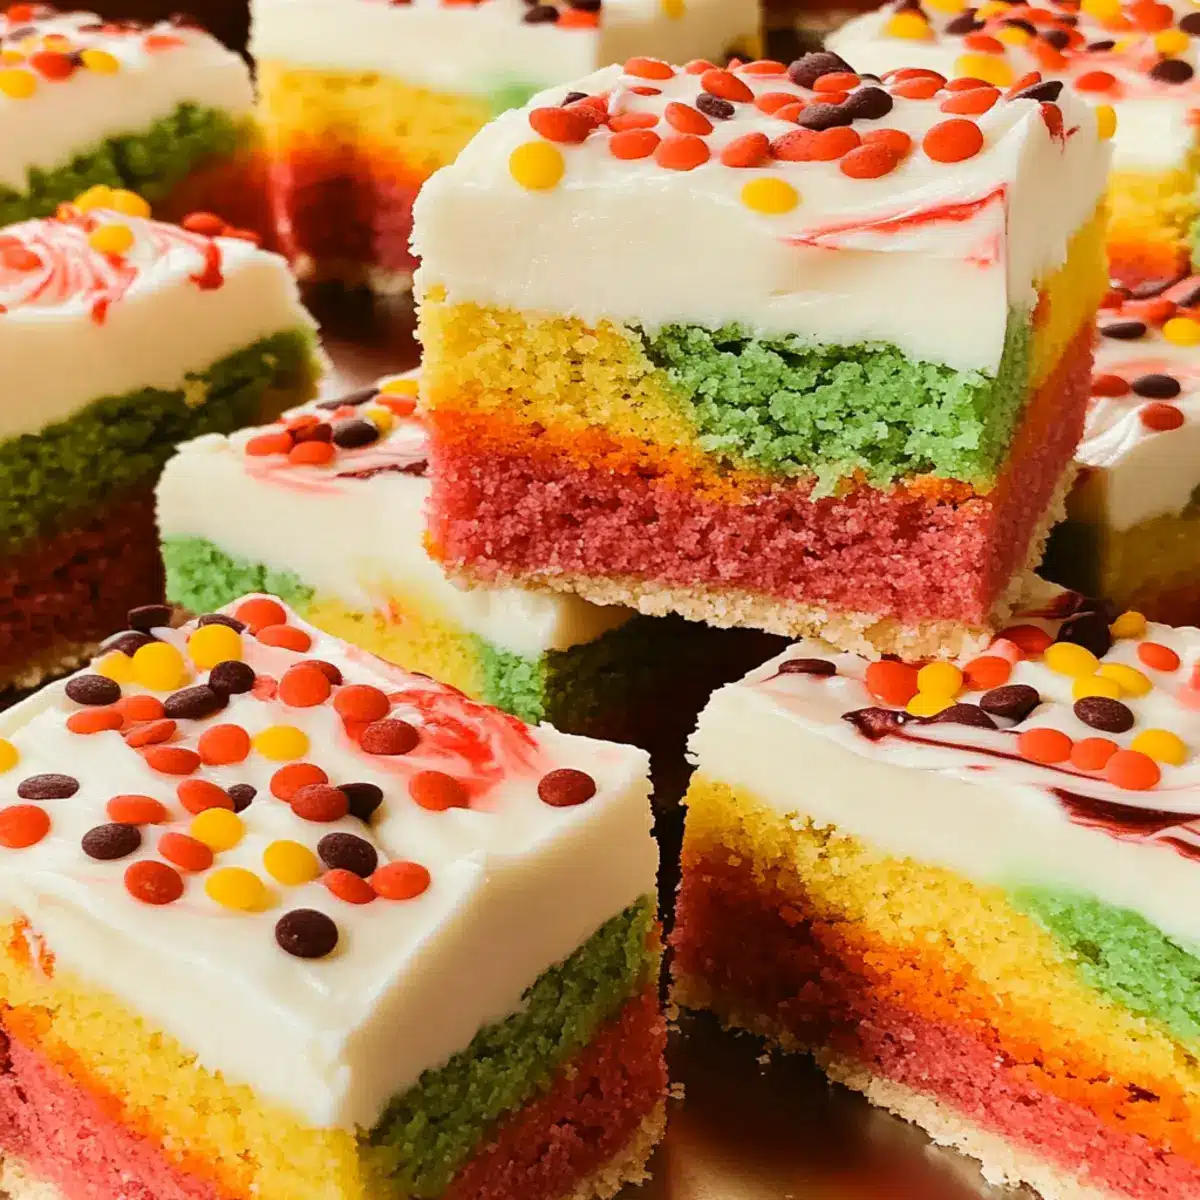
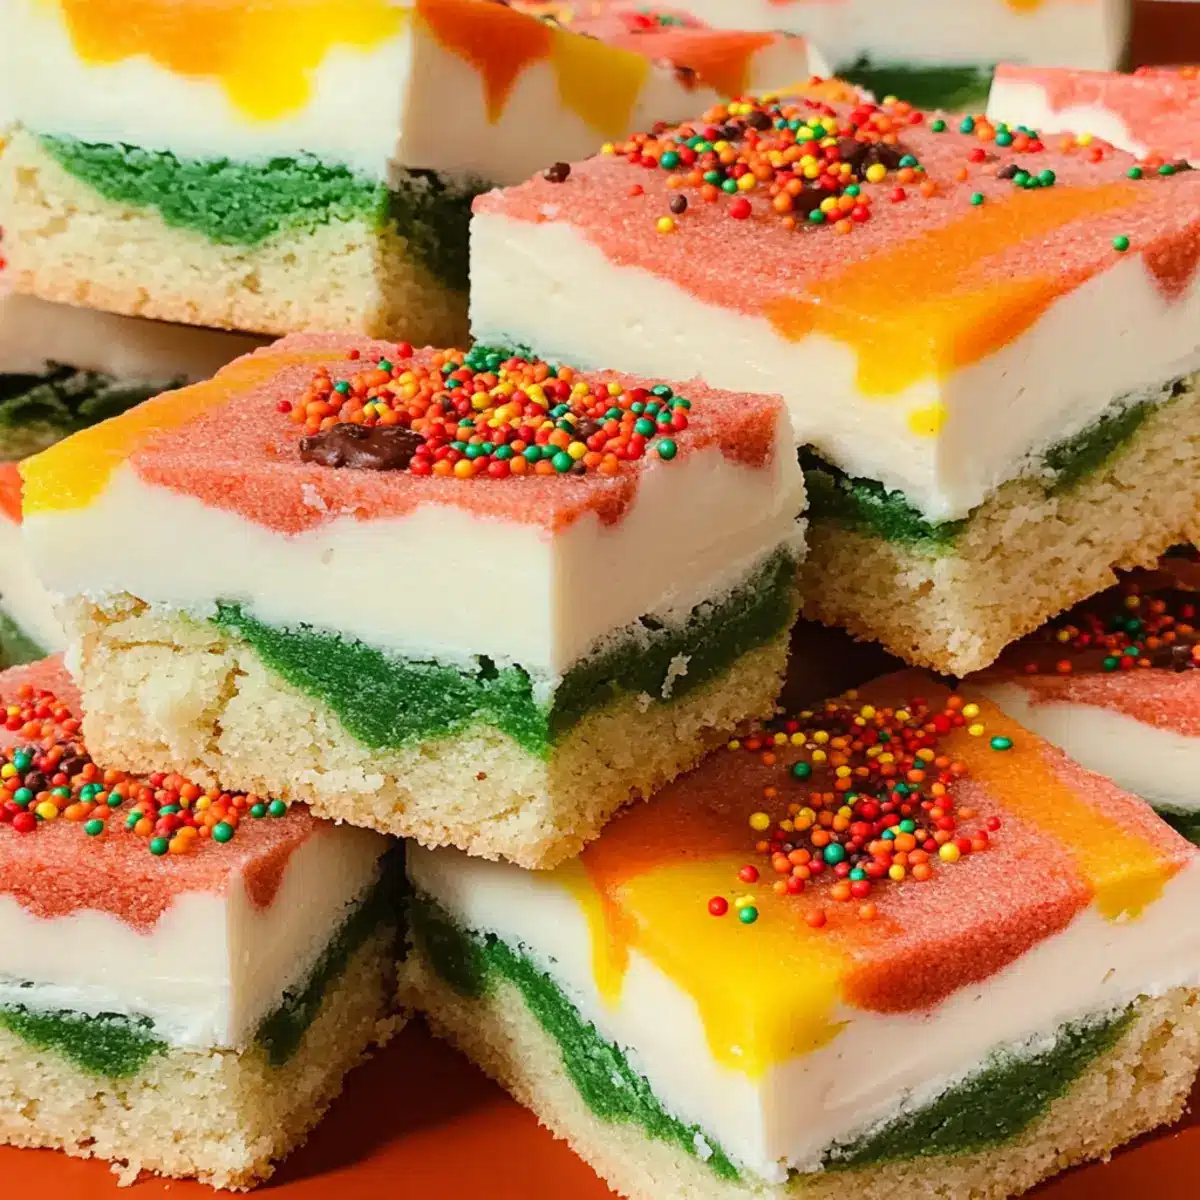
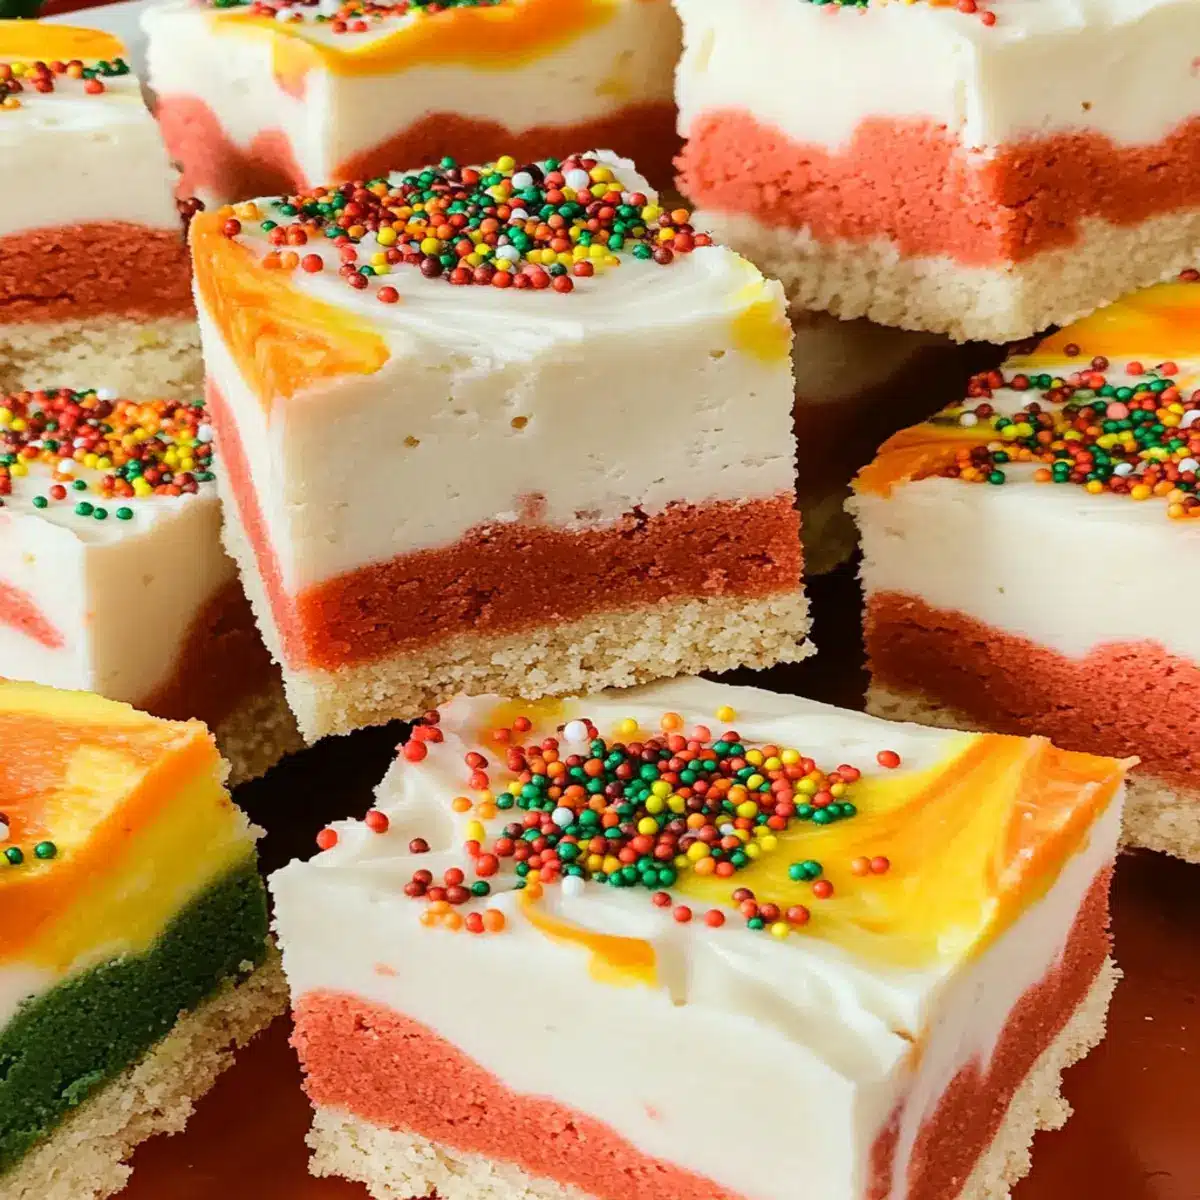
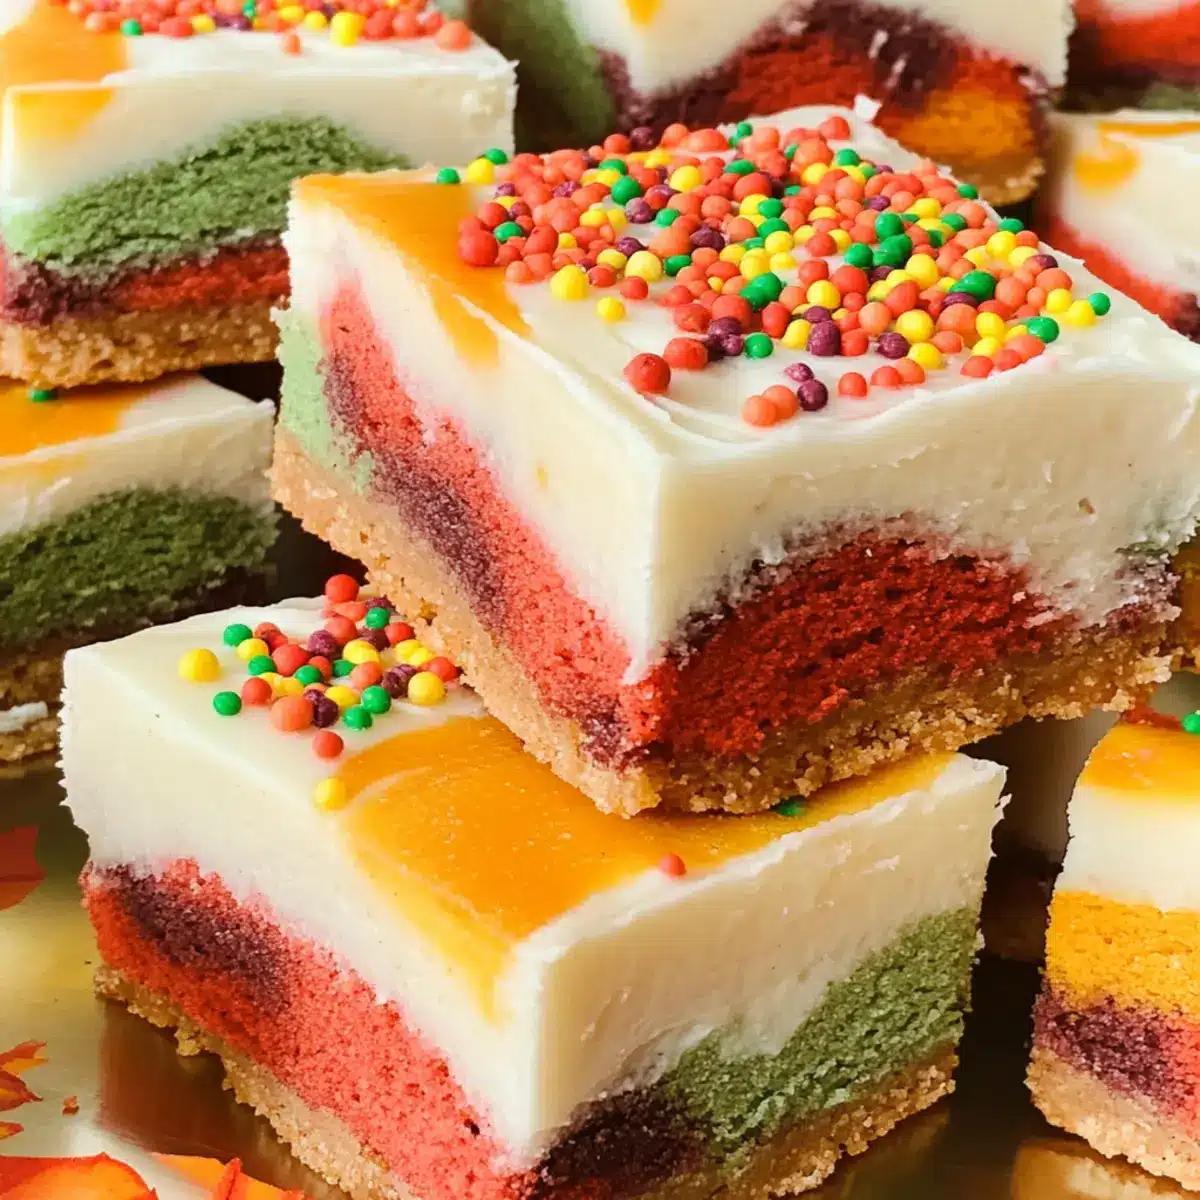
As I pulled these vibrant Harvest Marble Sugar Cookie Bars from the oven, I couldn’t help but marvel at the festive swirl of colors that perfectly captures the spirit of fall. These delightful bars not only elevate your dessert game with their stunning presentation, but they also promise easy prep and a rich buttery flavor that everyone will adore. Made with a simple sugar cookie base, this recipe incorporates a unique marbling technique that transforms ordinary baking into a feast for the eyes. Whether you’re whipping up treats for Thanksgiving or looking for a crowd-pleaser at your next gathering, these cookie bars will make a memorable impression. Ready to dive into a world of flavors and colors? Let’s get started!
Why Are These Bars So Special?
Visually Stunning: The vibrant marbling technique creates a feast for the eyes, making these cookie bars the centerpiece of your dessert table.
Rich Flavor: With a buttery sugar cookie base, every bite offers a delightful sweetness that perfectly complements festive gatherings.
Easy to Make: Don’t worry if you’re not a pro in the kitchen; this recipe is simple enough for bakers of all levels!
Versatile Treat: Enjoy these bars as a festive dessert at Thanksgiving or transform them into colorful treats for any occasion.
Storage-Friendly: Keep leftovers fresh for days—these bars can last in an airtight container at room temperature!
For a twist, try adding some chocolate chips or nuts, or check out my Harvest Thanksgiving Cupcakes recipe for more fall inspiration!
Harvest Marble Sugar Cookie Bars Ingredients
For the Cookie Bars
- Butter – Adds richness and moisture; opt for unsalted for better control over salt levels.
- Granulated Sugar – Provides sweetness and helps achieve a tender texture; consider a blend of regular and brown sugar for deeper flavor.
- Eggs – Essential for binding the ingredients; beaten eggs should reach a pale yellow for optimal texture.
- Vanilla Extract – Enhances flavor; using pure vanilla extract gives the best taste.
- All-Purpose Flour – The base of the cookie bar, providing structure; feel free to use a gluten-free flour blend if needed.
- Baking Soda – A leavening agent that gives the bars their light, fluffy texture.
- Food Coloring – Essential for creating the vibrant marbled effect; mix different colors to achieve your desired look.
For the Buttercream Frosting
- Butter – The key ingredient for buttery flavor; use softened, unsalted butter for best results.
- Powdered Sugar – Ensures sweetness and smoothness in the frosting; sift to avoid lumps.
- Heavy Cream – Adds creaminess; you can also swap it for milk if you’re looking for a lighter option.
- Vanilla Extract – A touch more enhances the flavor profile of the frosting; choose pure for a richer taste.
With these ingredients in hand, you’ll be well on your way to creating your own delightful Harvest Marble Sugar Cookie Bars that brighten up your fall festivities!
Step‑by‑Step Instructions for Harvest Marble Sugar Cookie Bars
Step 1: Cream Butter and Sugar
In a large mixing bowl, use an electric mixer to cream together 1 cup of softened unsalted butter and 1 ½ cups of granulated sugar on medium speed until the mixture becomes light and fluffy, about 3-5 minutes. This creates a rich base for your Harvest Marble Sugar Cookie Bars.
Step 2: Incorporate Eggs and Vanilla
Add 2 large beaten eggs and 1 tablespoon of pure vanilla extract to the creamed butter and sugar. Mix on medium speed until everything is well combined and the mixture looks smooth and pale, about 1-2 minutes. This ensures proper binding and flavor for your cookie bars.
Step 3: Combine Dry Ingredients
Gradually sift in 3 ½ cups of all-purpose flour and 1 teaspoon of baking soda to the wet mixture. Mix on low speed until fully incorporated, taking care not to overmix. You want the dough to come together, forming a soft, cohesive batter ideal for the marbling technique.
Step 4: Divide the Dough
Once combined, transfer the dough onto a lightly floured surface and divide it into five equal portions. Leave one portion white while adding food coloring to the remaining four portions—using shades like red, orange, gold, and sage—to create that festive marbled look in your Harvest Marble Sugar Cookie Bars.
Step 5: Prepare Baking Sheet
Preheat your oven to 375°F (190°C) and line a baking sheet with parchment paper. Using your hands, randomly drop pieces of the colored dough onto the sheet, mixing and layering the colors for a beautiful marbled effect. This will set the stage for your eye-catching cookie bars.
Step 6: Press and Bake
Gently press the pieces of dough down until they’re about ¾ inch thick, ensuring an even surface. Cover with another piece of parchment paper before placing them in the oven. Bake for 10-15 minutes until the edges are lightly golden but the center appears slightly underbaked, ensuring a soft texture in your bars.
Step 7: Cool and Frost
Remove the baking sheet from the oven and allow the cookie bars to cool completely on a wire rack. Once cooled, top them generously with buttercream frosting. Feel free to sprinkle some seasonal decorations on top to enhance the festive appeal of your gorgeous Harvest Marble Sugar Cookie Bars.
Expert Tips for Harvest Marble Sugar Cookie Bars
-
Don’t Overmix Dough: Overmixing can lead to tough cookie bars; mix just until combined for a soft, tender texture.
-
Vibrant Colors: To achieve vibrant marbling, start with a few drops of food coloring and mix until you reach your desired shade.
-
Baking Time: Keep an eye on the baking time; underbaking slightly ensures the bars remain soft and chewy, preventing them from being dry.
-
Proper Cooling: Allow the cookie bars to cool completely before frosting; this prevents the frosting from melting and makes for a beautiful presentation.
-
Storage Tips: Store the frosted Harvest Marble Sugar Cookie Bars in an airtight container for up to 3 days at room temperature, keeping them fresh and delightful.
Harvest Marble Sugar Cookie Bars Variations
Feel free to let your imagination run wild with these flavorful twists and substitutes for your cookie bars!
- Natural Colors: Swap standard food coloring for natural alternatives like beet juice for red and turmeric for yellow for a healthier option.
- Flavor Boost: Mix in chocolate chips or chopped nuts for added texture and a delightful crunch that pairs perfectly with the soft bars.
- Cream Cheese Frosting: Try using cream cheese frosting instead of buttercream for a tangy, rich flavor that complements the sweetness beautifully.
- Spiced Up: Add a teaspoon of your favorite fall spices, such as cinnamon or nutmeg, to the dough for an extra layer of warm flavor.
- Gluten-Free: Replace all-purpose flour with a gluten-free flour blend for a gluten-free treat that everyone can enjoy without sacrificing taste.
- Mini Bars: Roll and press the dough into bite-sized mini bars for a perfect snack that’s easy to share at gatherings.
- Dairy-Free: Use vegan butter and your favorite dairy-free milk in the frosting for a delicious dairy-free version that everyone will love.
With these ingenious variations, you can customize your Harvest Marble Sugar Cookie Bars to suit any palate. For more fall baking inspiration, check out my Harvest Thanksgiving Cupcakes or explore a delightful twist on banana bread with my Sugar Free Banana recipe! Enjoy the creativity!
Storage Tips for Harvest Marble Sugar Cookie Bars
Room Temperature: Store the frosted cookie bars in an airtight container at room temperature for up to 3 days to maintain their freshness and flavor.
Freezer: For longer storage, freeze un-frosted cookie bars by wrapping them tightly in plastic wrap and placing them in a freezer-safe bag. They can last up to 3 months.
Thawing: When ready to enjoy, simply thaw the frozen bars at room temperature for about 1 hour before frosting or serving.
Reheating: If you prefer warm cookie bars, reheat them in the oven at 250°F (120°C) for about 5-7 minutes, ensuring they remain soft and chewy.
What to Serve with Harvest Marble Sugar Cookie Bars
Create a delightful dining experience with these sweet, colorful treats that will brighten any fall gathering.
- Warm Apple Cider: The cozy spice of apple cider complements the sweetness of the cookie bars, making it a classic fall pairing.
- Pumpkin Pie: This traditional dessert celebrates the season with its warm spices and creamy texture, perfectly balancing the vibrant flavors of the cookie bars.
- Whipped Cream: Light and airy, a dollop of fresh whipped cream adds an elegant touch and enhances the buttery profile of the dessert.
- Decorated Cheesecake: A festive cheesecake topped with seasonal fruits can elevate your dessert spread while providing a rich, creamy contrast to the cookie bars.
- Coffee or Espresso: Brewed coffee brings a robust flavor that harmonizes beautifully with the sweetness of the Harvest Marble Sugar Cookie Bars.
- Autumn Fruit Salad: A refreshing mix of apples, pears, and pomegranate seeds adds a crisp and juicy bite, balancing the richness of the bars.
- Maple Syrup Drizzle: A drizzle of rich, earthy maple syrup over the cookie bars introduces a touch of fall’s sweetness.
- Chocolate Milk: Creamy and nostalgic, this drink pairs wonderfully with the bars, making it a fun treat for kids and adults alike.
- Caramel Sauce: A warm caramel drizzle on top or beside the bars enhances their festive appeal and adds a gooey sweetness that everyone loves.
Make Ahead Options
These Harvest Marble Sugar Cookie Bars are ideal for meal prep aficionados looking to save time without sacrificing flavor! You can prepare the cookie dough up to 24 hours in advance by mixing all the ingredients and dividing the dough into portions. Simply refrigerate the wrapped dough until you’re ready to bake. When the time comes, drop the colored portions onto the baking sheet and bake as directed. As for the buttercream frosting, it can be made up to 3 days in advance and stored in an airtight container in the fridge—just give it a good stir before frosting to bring back its creamy texture. This way, you’ll have a festive treat ready to impress with minimal last-minute effort!
Harvest Marble Sugar Cookie Bars Recipe FAQs
What type of butter should I use for the Harvest Marble Sugar Cookie Bars?
Absolutely! It’s best to use unsalted butter for these cookie bars. This allows you to control the saltiness of the recipe. Softened at room temperature, the butter should be creamy for the ideal texture when mixed with sugar.
How should I store the Harvest Marble Sugar Cookie Bars?
To keep these delightful bars fresh, store the frosted cookie bars in an airtight container at room temperature for up to 3 days. If you need longer storage, freeze the un-frosted bars wrapped tightly in plastic wrap, and then place them in a freezer-safe bag—these can last for up to 3 months.
Can I freeze Harvest Marble Sugar Cookie Bars?
Yes! To freeze your cookie bars, wrap the un-frosted bars tightly in plastic wrap and place them into a freezer-safe bag. When you’re ready to enjoy them, simply remove them from the freezer and allow them to thaw at room temperature for about 1 hour before frosting, ensuring they retain their soft, chewy texture.
What if my cookie bars are too dry after baking?
If your cookie bars turn out too dry, it could be due to overbaking or using too much flour. To avoid this, make sure to follow the baking time closely; they should be slightly underbaked when removed from the oven. Additionally, consider spooning the flour into your measuring cup instead of scooping it directly, as this can prevent overpacking.
Are Harvest Marble Sugar Cookie Bars suitable for those with food allergies?
These cookie bars contain common allergens such as gluten and eggs. However, you can make them gluten-free by using a suitable gluten-free flour blend. Always ensure to check for any specific dietary requirements of your guests, and feel free to ask them about any allergies before serving.
Harvest Marble Sugar Cookie Bars That Brighten Your Fall Festivities
Ingredients
Equipment
Method
- In a large mixing bowl, cream together the butter and sugar on medium speed until light and fluffy, about 3-5 minutes.
- Add beaten eggs and vanilla extract, mixing on medium speed until smooth and pale, about 1-2 minutes.
- Gradually sift in the flour and baking soda, mixing on low speed until fully incorporated.
- Divide the dough onto a lightly floured surface, leaving one portion white and adding food coloring to the other four to create a marbled effect.
- Preheat oven to 375°F (190°C) and line a baking sheet with parchment paper. Drop pieces of the colored dough onto the sheet.
- Gently press the dough down to about ¾ inch thick. Bake for 10-15 minutes until edges are golden but the center is underbaked.
- Allow the cookie bars to cool completely on a wire rack before frosting with buttercream and optional decorations.
Leave a Reply