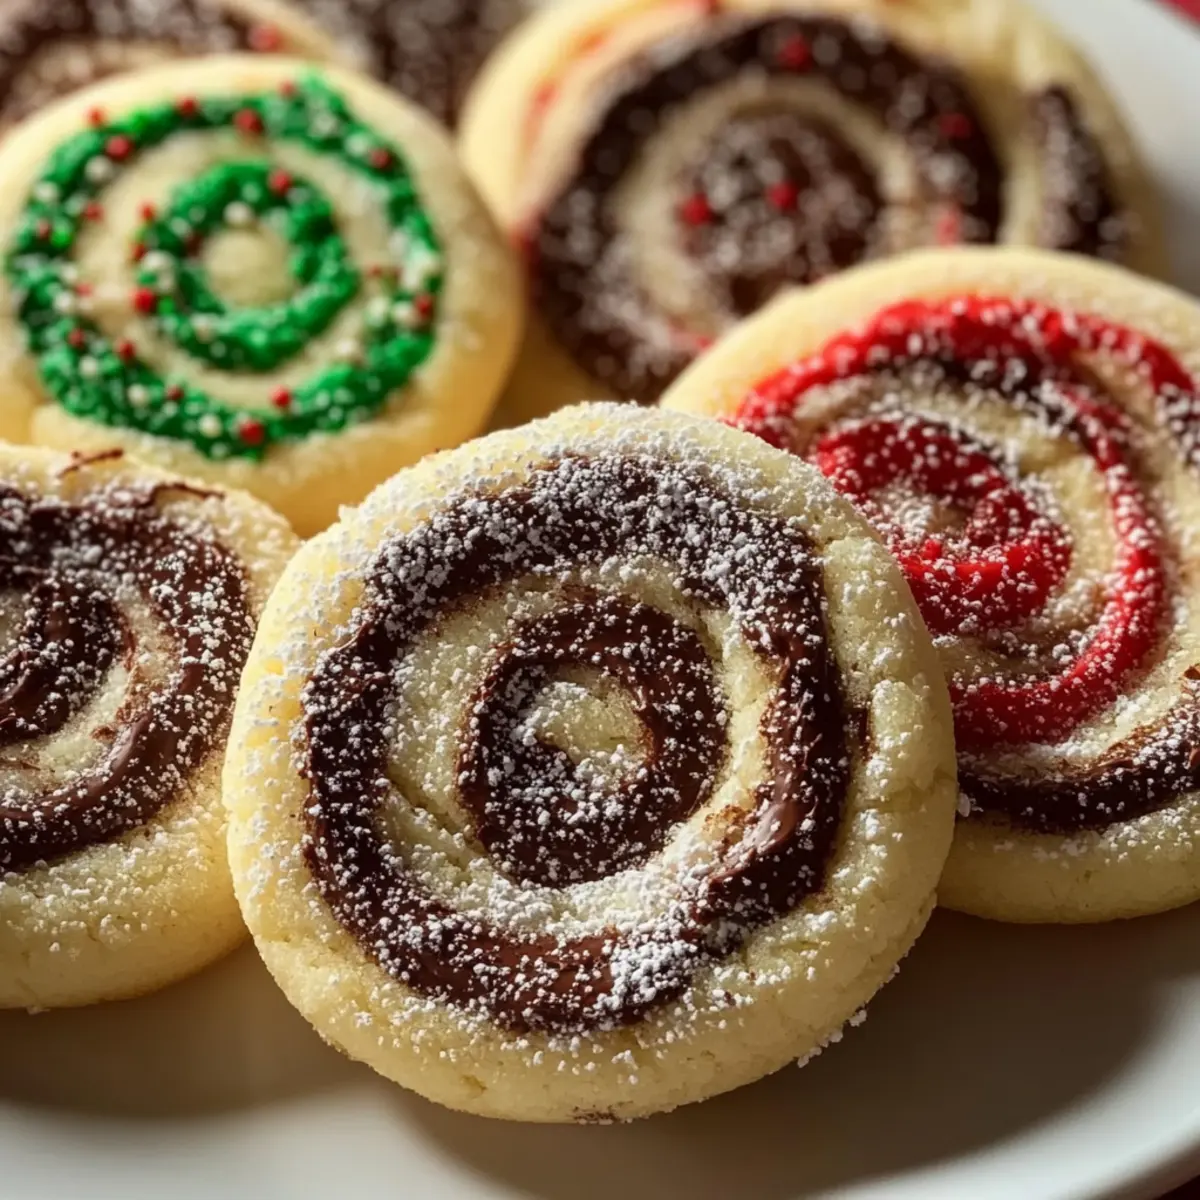
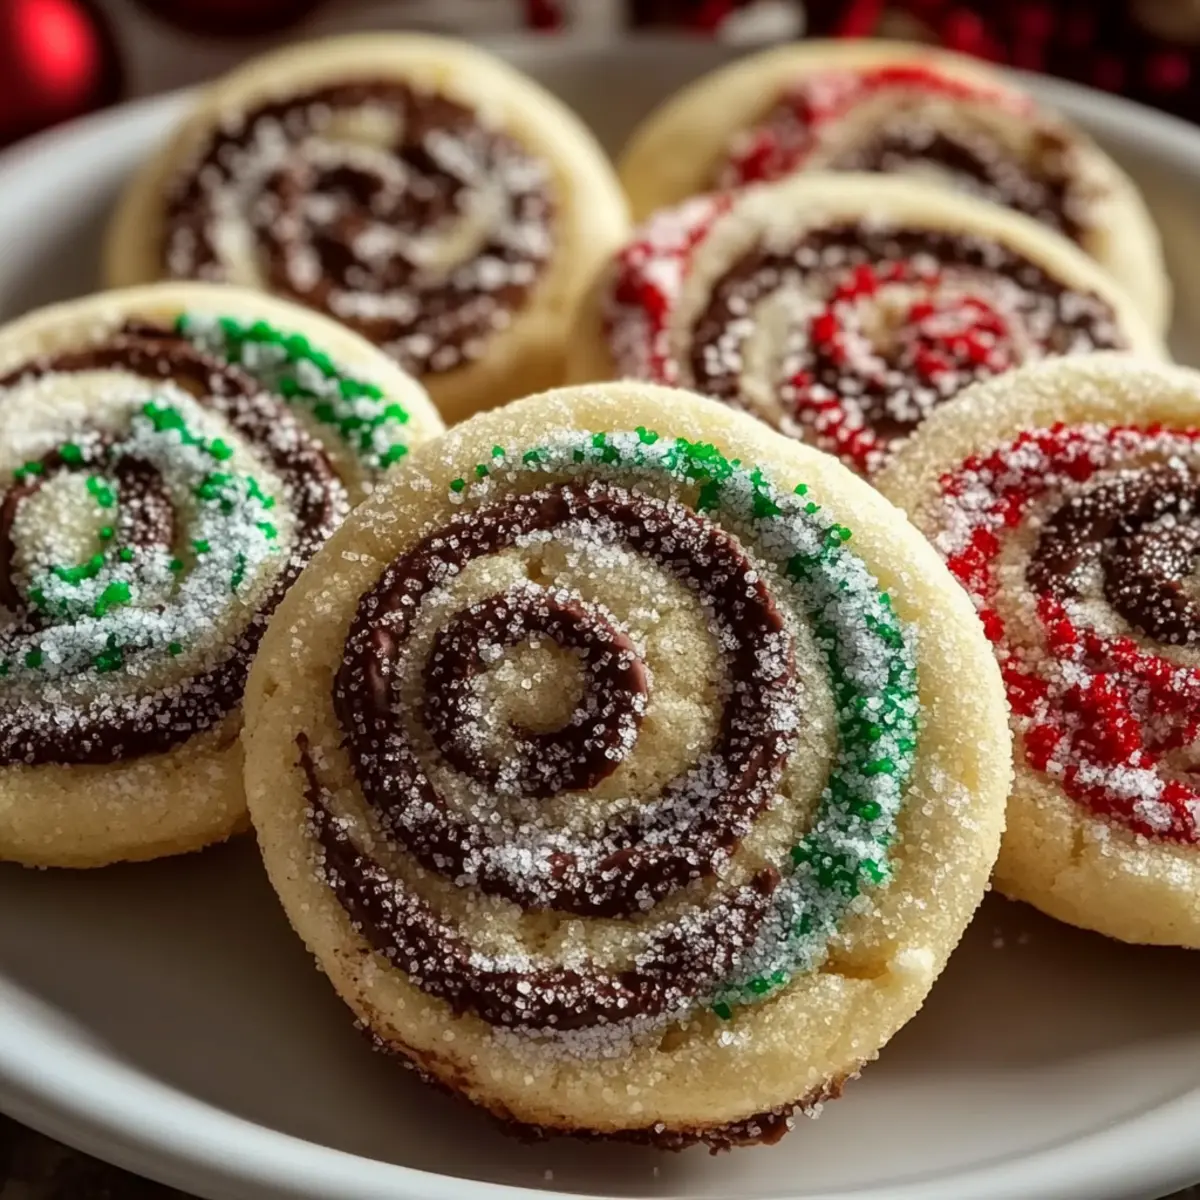
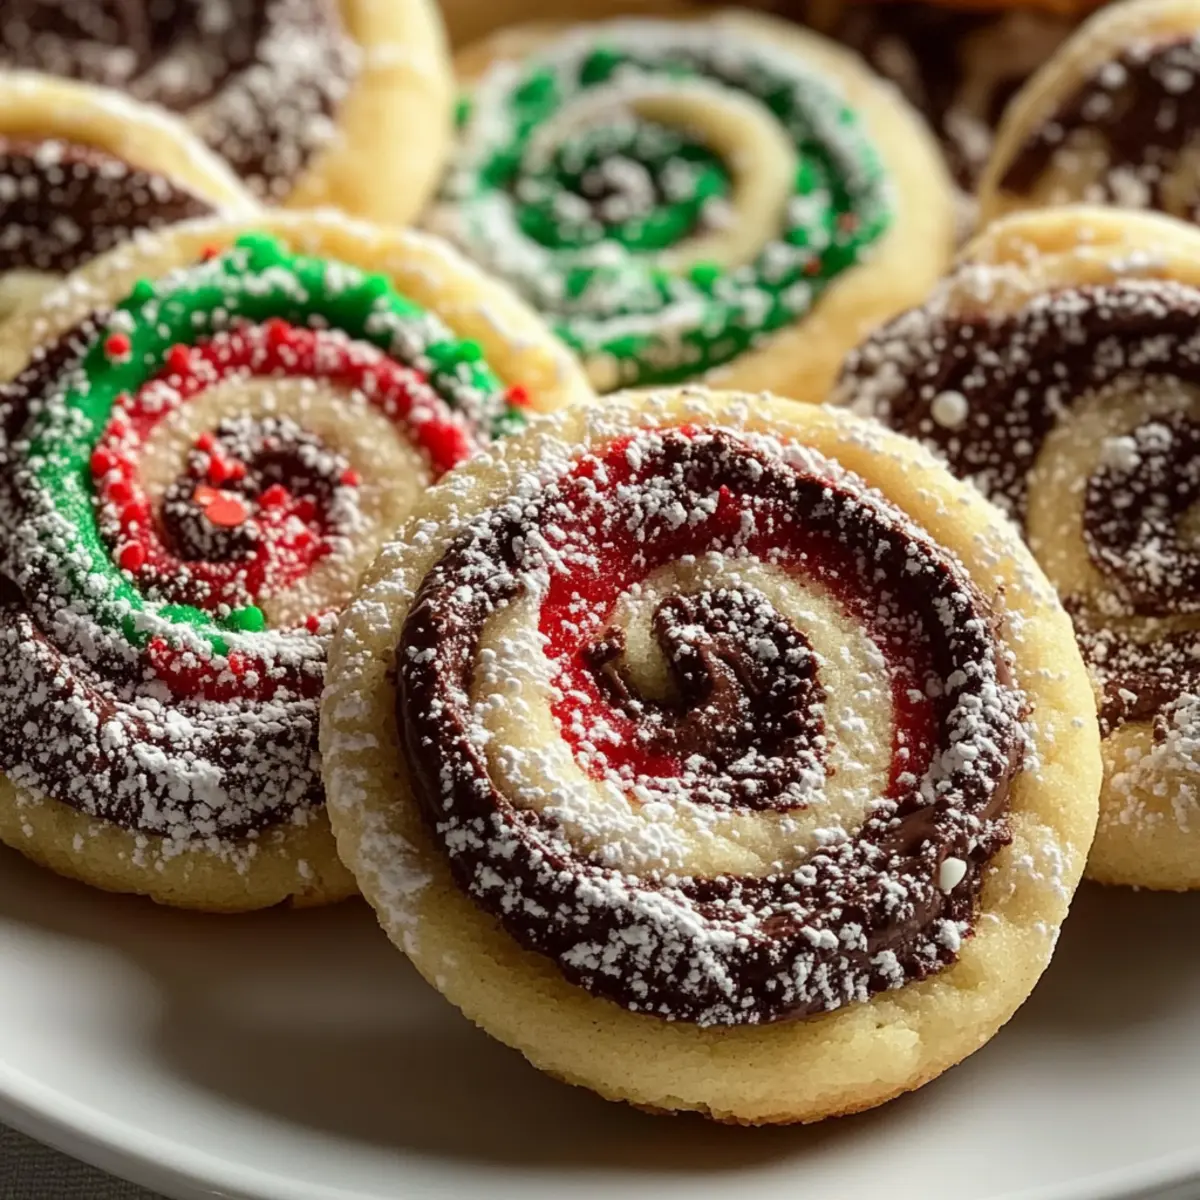
As I unwrapped the delicate logs of dough, the alluring aroma of chocolate and vanilla filled my kitchen, transporting me to fond memories of childhood holiday baking. The Festive Swirled Christmas Cookies, with their vibrant red and green sprinkles, promise to not only delight the eyes but also the taste buds. These charming cookies are a wonderful blend of rich, buttery flavors, making them an irresistible choice for any festive gathering. Not only are they a feast for the senses, but they also bring a dash of creativity to your holiday baking—perfect for impressing family and friends! With just a bit of patience for chilling and shaping, you can create a colorful treat that’s sure to become a cherished tradition. Ready to dive into this delightful baking adventure? Let’s get started!
Why are Swirled Christmas Cookies irresistible?
**Irresistible *Aesthetics:* These cookies aren’t just tasty; they’re stunning! The vibrant swirls of chocolate and vanilla create an eye-catching treat for your holiday table.
**Mouthwatering *Flavor:* The combination of rich chocolate and buttery vanilla flavors makes each bite a heavenly experience.
**Perfect *Texture:* Enjoy a tender crumb that melts in your mouth, bringing warmth and nostalgia to every festive occasion.
**Versatile *Variations:* Feel free to get creative with flavor extracts or even try matcha for a unique twist!
**Crowd *Pleaser:* Whether you’re gifting them or sharing at parties, these cookies are bound to impress everyone! If you’re looking for other festive ideas, check out these Tiramisu Christmas Cookies or Christmas Mini Cookies.
Swirled Christmas Cookies Ingredients
For the Cookie Dough
- All-Purpose Flour – Provides structure, ensuring the cookies hold their shape and have that tender crumb we love.
- Baking Soda – Acts as a leavening agent, creating a slightly airy texture within the cookies.
- Salt – Balances sweetness and enhances the flavors of the dough components.
- Unsalted Butter (1 cup) – Adds richness and moisture; creamy delight is achieved when mixed with sugar. Substitute with margarine for a dairy-free option.
- Granulated Sugar (1 cup) – Sweetens the dough while contributing to the pleasing texture of the cookies.
- Brown Sugar (1 cup) – Infuses a deep, chewy texture with hints of molasses, beautifully complementing the chocolate.
- Vanilla Extract (1 tsp) – Infuses warmth and a heavenly aroma that enhances the overall flavor of your Swirled Christmas Cookies.
- Large Egg (1) & Egg Yolk (1) – Binds the ingredients together, adding richness for smooth, delectable dough.
- Unsweetened Cocoa Powder (1/4 cup) – Creates the chocolate portion, offering intense flavor and fabulous visual contrast.
For the Decoration
- Powdered Sugar (2 cups) – Used for dusting, it adds a snowy finish that makes these cookies enchanting.
- Red and Green Sprinkles – Decorative elements contributing festive flair and a playful crunch that everyone will adore!
Step‑by‑Step Instructions for Swirled Christmas Cookies
Step 1: Preheat and Prepare
Start your festive baking by preheating the oven to 350°F (175°C). Line two baking sheets with parchment paper, creating a non-stick surface for your Swirled Christmas Cookies. This will ensure they bake evenly and release easily when done, ready for that delicious decorating touch later.
Step 2: Mix Dry Ingredients
In a medium-sized mixing bowl, combine 2 cups of all-purpose flour, 1 teaspoon of baking soda, and a pinch of salt. Use a whisk to blend these dry ingredients thoroughly, ensuring even distribution for perfect texture. Once mixed, set the bowl aside while you prepare the buttery base, ready for a delightful dough.
Step 3: Cream Butter and Sugars
In a large bowl, cream together 1 cup of unsalted butter, 1 cup granulated sugar, and 1 cup of brown sugar using an electric mixer. Beat this mixture on medium speed for about 3-4 minutes until it becomes light and fluffy. This step is crucial for your cookies’ delightful texture, contributing to their tender and melt-in-your-mouth quality.
Step 4: Add Eggs and Vanilla
Next, blend in 1 large egg, 1 egg yolk, and 1 teaspoon of vanilla extract into the creamed mixture. Mix on low to ensure everything is well combined, creating a smooth, rich dough. The egg acts as a binder, while the vanilla infuses warmth, setting the stage for flavorful Swirled Christmas Cookies.
Step 5: Incorporate Dry Ingredients
Gradually add the dry flour mixture to the wet ingredients, mixing until just combined. Take care not to overmix; you want a cohesive dough that’s slightly sticky but holds together. This balance is key for creating the delicious texture that makes these cookies truly irresistible this holiday season.
Step 6: Divide and Color Dough
Divide the dough into two equal portions. In one half, mix in 1/4 cup of unsweetened cocoa powder, folding gently until fully incorporated. This creates the chocolate portion, enhancing the visual appeal and flavor of your Swirled Christmas Cookies. The contrasting colors will make your finished treats truly festive.
Step 7: Shape and Chill Dough
Roll each portion of dough into logs about 12 inches long. Wrap them tightly in plastic wrap and refrigerate for at least 1 hour. Chilling allows the flavors to meld and makes the dough easier to slice later, ensuring your cookies have beautiful swirls when baked.
Step 8: Roll Out Dough
After chilling, remove the dough logs from the refrigerator. On a floured surface, roll out each log to a thickness of 1/4 inch. Use a rolling pin for evenness, and enjoy the fragrant aroma filling your kitchen as you prepare the layers that will form the heart of your Swirled Christmas Cookies.
Step 9: Layer and Roll
Layer the cocoa dough over the vanilla dough carefully. Starting from one end, gently roll the stacked dough into a tight log. Press firmly to ensure the layers stick together, preventing gaps in the swirls. This technique creates beautiful patterns when sliced, making your cookies visually enticing and memorable.
Step 10: Chill Again
Wrap the formed log in plastic wrap once more and refrigerate for an additional hour. This final chilling step will firm up the dough, making it easier to slice and ensuring your Swirled Christmas Cookies hold their shape beautifully during baking.
Step 11: Slice and Bake
Preheat the oven again if needed. Unwrap the log and slice it into 1/4-inch thick cookies. Place them on the prepared baking sheets, allowing some space between each cookie. Bake in your preheated oven for 10-12 minutes, or until the edges are lightly golden and firm to the touch.
Step 12: Cool and Decorate
Once baked, allow the cookies to cool on the baking sheet for 5 minutes before transferring them to a wire rack. Once cool, dust your Swirled Christmas Cookies with powdered sugar and thoughtfully sprinkle red and green decorations on top. This festive touch adds a touch of whimsy, perfect for holiday gatherings!
Make Ahead Options
These Festive Swirled Christmas Cookies are perfect for busy home cooks looking to save time during the holiday season! You can prepare the dough up to 24 hours in advance by following the first six steps—creating and shaping the logs—then tightly wrapping them in plastic and refrigerating. This allows the flavors to deepen while making slicing much easier when ready to bake. For optimal quality, avoid leaving the dough out at room temperature to maintain its firmness. When you’re ready to bake, simply slice the chilled logs into cookies, bake for 10-12 minutes, and enjoy delightful, perfectly swirled treats just as delicious as if they were made fresh!
Expert Tips for Swirled Christmas Cookies
- Cool Completely: Ensure cookies cool fully before dusting with powdered sugar. This prevents the sugar from melting and losing its delightful appearance.
- Tightly Roll: Roll the dough tightly to avoid gaps in the swirls, which keeps your Swirled Christmas Cookies visually appealing and well-defined.
- Watch Baking Time: Keep a close eye on the cookies as they bake; overbaking can result in dry cookies, losing their tender texture.
- Add Color: For a fun twist, experiment with food coloring in the dough for vibrant swirls that add extra festivity to your holiday treats.
- Chill Before Cutting: Make sure to chill the shaped log again; this helps the cookies maintain their shape while slicing and baking to perfection.
What to Serve with Festive Swirled Christmas Cookies
Baking a batch of these delightful cookies sets the stage for a joyful holiday feast; let’s create an unforgettable spread!
- Hot Chocolate Bar: Diversify your holiday treat table by offering a hot chocolate bar with toppings like whipped cream, peppermint sticks, and marshmallows—a cozy, indulgent pairing!
- Creamy Peppermint Bark: The rich chocolatey layers of peppermint bark provide a contrasting texture to the buttery Swirled Christmas Cookies, enhancing the festive flavor.
- Gingerbread Men: These classic treats complement the cookies’ sweetness with their warm, spiced flavors, creating a whimsical, nostalgic connection for everyone gathered.
- Fruit Platter: A colorful arrangement of fresh fruit adds a refreshing element to the table, balancing the sweetness of the cookies with a burst of natural juiciness.
- Festive Eggnog: Rich and creamy eggnog, sprinkled with nutmeg, delivers a delightful drink option that transports your taste buds into the heart of the holiday spirit.
- Holiday Charcuterie Board: Create a festive charcuterie board with cheeses, cured meats, and crackers, which offers a savory contrast to the sweet cookies, satisfying a diverse range of palates.
- Vanilla Ice Cream: Serve scoops of vanilla ice cream on the side; the cold, creamy texture beautifully enhances the cookies’ warm, tender crumb.
- Chocolate Dipped Fruit: Dip strawberries or banana slices in chocolate for a simple yet elegant dessert that pairs wonderfully with the cookies’ flavors.
- Christmas Punch: A vibrant, fruity punch can tie the whole holiday theme together, offering a refreshing sipper that complements the sweetness of the Swirled Christmas Cookies.
Swirled Christmas Cookies Variations
Feel the creative holiday spirit as you explore delightful twists on our delicious swirled cookies!
- Dairy-Free: Substitute butter with dairy-free margarine and use a plant-based milk for a creamy texture without dairy.
- Matcha Magic: Swap cocoa powder for matcha powder to add a vibrant green swirl that offers a unique flavor experience.
- Nutty Delight: Fold in chopped walnuts or pecans into the dough for a delightful crunch that pairs beautifully with the buttery flavor.
- Minty Fresh: Incorporate peppermint extract into the vanilla dough for an invigorating twist that brings a festive touch to your cookies.
- Fruit Fusion: Add dried cranberries or cherries to the dough for a tart contrast that beautifully complements the sweetness.
- Chocolate Chip: Sprinkle semi-sweet or white chocolate chips into both doughs for an extra dose of decadent chocolate flavor.
- Flavored Extracts: Experiment with extracts like almond or orange for a surprising flavor boost that can enhance the holiday experience.
- Citrus Zest: Grate some lemon or orange zest into your dough for a refreshing citrus punch that brightens up each bite.
If you’re looking for more festive ideas, consider trying out my Christmas Mini Cookies or my delectable Christmas Spice Cake for your holiday gatherings!
Storage Tips for Swirled Christmas Cookies
Room Temperature: Store in an airtight container at room temperature for up to 5 days to keep them fresh and flavorful.
Freezer: These delightful Swirled Christmas Cookies can be frozen for up to 3 months; wrap them tightly in plastic wrap before placing them in a freezer-safe bag.
Thawing: When ready to enjoy, simply thaw the cookies in the refrigerator overnight or at room temperature for a few hours before serving.
Reheating: For a warm treat, pop the cookies in the oven at 350°F (175°C) for about 5 minutes, bringing back that fresh-baked aroma!

Swirled Christmas Cookies Recipe FAQs
What kind of ingredients should I use?
Absolutely! For the best results, choose fresh ingredients. Make sure your butter is at room temperature for easy creaming, and select all-purpose flour with no signs of clumping. When picking cocoa powder, select one that’s unsweetened and rich for maximum chocolate flavor!
How do I store my Swirled Christmas Cookies?
To keep your cookies fresh and soft, store them in an airtight container at room temperature for up to 5 days. If you want to save them for longer, freeze them for up to 3 months. Just ensure they’re tightly wrapped in plastic wrap or a freezer-safe bag to prevent freezer burn.
Can I freeze these cookies?
Yes! Freezing your Swirled Christmas Cookies is a wonderful option. After baking and cooling them entirely, layer them between sheets of parchment paper in an airtight container or wrap them individually in plastic wrap. When you’re ready to enjoy, thaw them in the refrigerator overnight or leave them at room temperature for a few hours.
What should I do if my dough is too sticky?
Very common! If you find your dough is overly sticky, try chilling it for an additional 30 minutes. This will help firm it up and make it easier to handle. Alternatively, dust your workspace and hands with flour while rolling it out to prevent sticking—just be mindful not to add too much flour as it can change the texture.
Are these cookies suitable for people with allergies?
Keep in mind that these Swirled Christmas Cookies contain common allergens such as wheat (flour) and dairy (butter). If you’re looking for alternatives, you can use gluten-free flour blends and dairy-free margarine. However, be sure to check labels for any specific allergies for pets or guests, especially regarding chocolate; it can be toxic to dogs.
Swirled Christmas Cookies That Bring Holiday Joy
Ingredients
Equipment
Method
- Preheat the oven to 350°F (175°C) and line two baking sheets with parchment paper.
- In a mixing bowl, combine the flour, baking soda, and salt; set aside.
- Cream the butter, granulated sugar, and brown sugar together until light and fluffy.
- Add the egg, egg yolk, and vanilla to the mixture and blend well.
- Gradually mix in the dry ingredients until just combined.
- Divide the dough and mix in the cocoa powder to one half.
- Roll each portion into logs about 12 inches long and chill for 1 hour.
- Roll out each log to a thickness of 1/4 inch on a floured surface.
- Layer the cocoa dough over the vanilla dough and roll into a tight log.
- Wrap the log and chill again for 1 hour.
- Slice into 1/4-inch thick cookies and place on prepared baking sheets.
- Bake for 10-12 minutes until edges are lightly golden.
- Cool for 5 minutes, then dust with powdered sugar and add sprinkles.
Leave a Reply