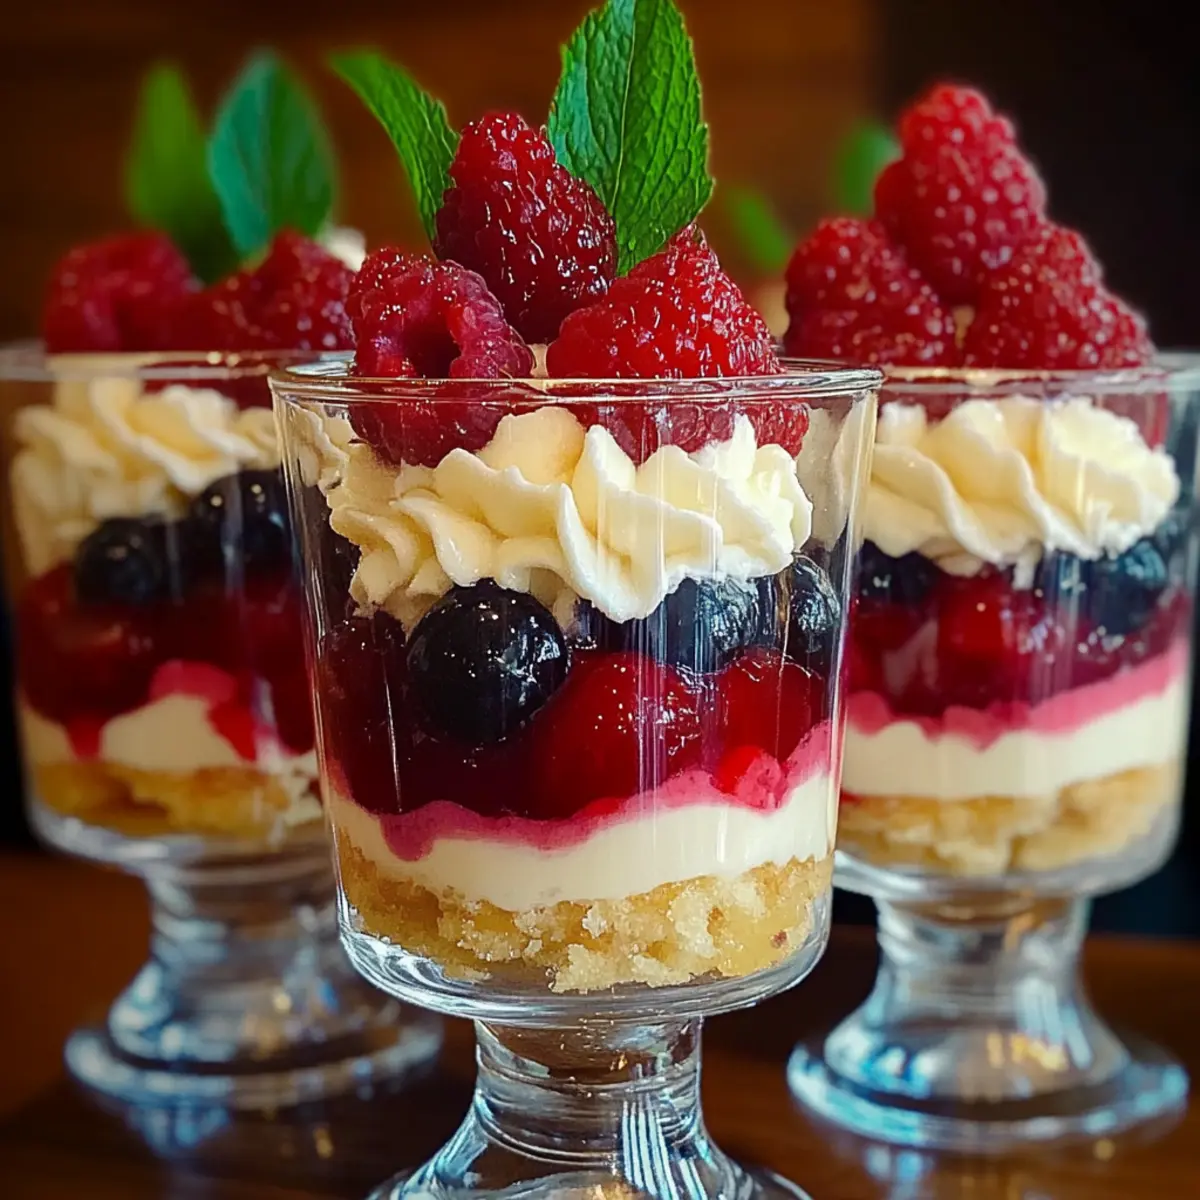
As I stood in my kitchen, the sun streaming through the window, I felt that familiar thrill of creativity sparking within me. What better way to celebrate the sweetness of life than with Customizable Mini Trifles? These delightful layered desserts are a feast for the eyes and the palate, showcasing creamy custard, fresh berries, and a hint of jelly that dances with color and flavor. Perfect for special occasions or a cozy night in, these trifles shine for their versatility—they can be made ahead, allowing you to savor quality time with loved ones instead of being stuck in the kitchen. Plus, their customizable nature means you can mix and match ingredients to suit every season or preference. Ready to dive into a world of delicious layers? Let’s get started!

Why are Mini Trifles so special?
Versatile, these trifles allow for endless creativity—swap in seasonal fruits or flavored creams for unique variations. Make-Ahead magic: Prepare these layered delights in advance, saving you stress during gatherings. Visually stunning, they create an impressive presentation that will wow your guests. Light and fresh, they’re the perfect treat that won’t weigh you down. If you’re eager to try more delicious desserts, check out my Christmas Mini Cookies for another crowd-pleaser!
Mini Trifles Ingredients
For the Creamy Layer
- Creamy Custard – Provides a rich, smooth texture and flavor; substitute with vanilla pudding mix for quicker preparation.
- Whipped Cream – Enhances the creaminess; use freshly whipped for best results.
For the Fruity Layer
- Jelly (e.g., berry or fruit flavor) – Adds sweetness and a fruity layer; opt for fruit juice gelatin for a healthier option.
- Fresh Berries (e.g., strawberries, blueberries, raspberries) – Offers freshness and vibrant color; substitute with seasonal fruits or frozen berries when fresh is unavailable.
For the Base Layer
- Sponge Cake (or ladyfingers) – Acts as the base layer, adding structure; can be substituted with gluten-free cake or crushed cookies for a different texture.
- Crushed Graham Crackers – A delightful crunchy option for a base; gives a sweet, buttery flavor.
Feel excited to create your own delicious mini trifles? Let your imagination run wild with these ingredients!
Step‑by‑Step Instructions for Customizable Mini Trifles
Step 1: Prepare the Custard
In a medium saucepan, whisk together your custard ingredients over low heat. Stir gently for about 10-15 minutes until the mixture thickens enough to coat the back of a spoon. Keep an eye on it, as you don’t want it to boil. Once thickened, remove from heat and let it cool completely before using in your mini trifles.
Step 2: Create the Jelly Layer
While the custard cools, prepare your jelly according to the package instructions, using hot water to dissolve it. Once fully dissolved, allow it to cool at room temperature until slightly thickened, about 20 minutes. This will help it maintain its shape when layered in your trifles. Set it aside, ready for assembly.
Step 3: Assemble the Layers
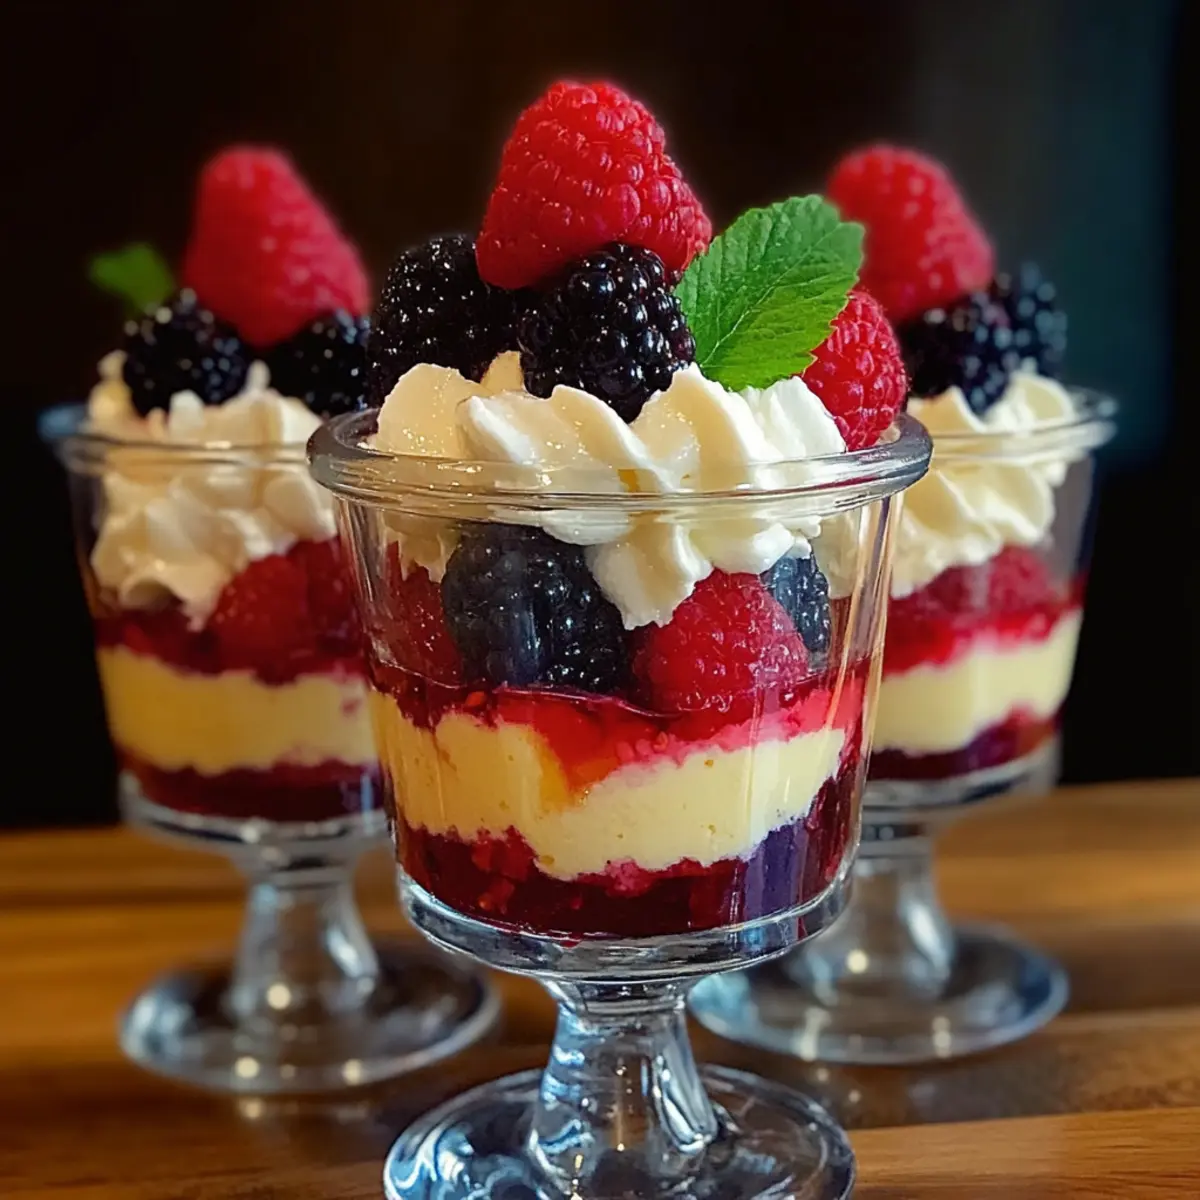
Grab clear cups or jars to showcase those beautiful layers of your mini trifles. Start by placing a spoonful of sponge cake or crushed cookies at the bottom of each cup, pressing slightly for a firm base. Next, add a generous layer of the creamy custard, followed by the jelly, and then a handful of fresh berries. Repeat the layering process until the cups are nearly full, finishing with a dollop of custard and berries on top.
Step 4: Chill the Mini Trifles
Once assembled, cover your mini trifles with plastic wrap or a lid and refrigerate them for at least 2 hours. This chilling step not only allows the flavors to meld beautifully but also helps set the jelly layer, ensuring that your dessert maintains its delightful structure when served.
Step 5: Serve and Garnish
When ready to serve your irresistible mini trifles, remove them from the refrigerator. For an extra touch of elegance, consider garnishing with additional fresh berries or a swirl of whipped cream on top. These lovely layered desserts are sure to impress your guests and delight your taste buds!
Storage Tips for Mini Trifles
Refrigerator: Store assembled mini trifles in airtight containers in the fridge for up to 2-3 days to maintain freshness and flavor.
Freezer: It’s best to avoid freezing assembled trifles, as it can affect the texture of the creamy layers. Instead, freeze each component separately, allowing you to assemble when ready.
Layering Components: If you’ve prepared the custard and jelly ahead of time, store them in sealed containers in the fridge for up to 5 days. This makes assembling your mini trifles quick and easy!
Serving: When ready to serve, take trifles out of the fridge, and garnish them with fresh berries or whipped cream for an extra touch of elegance!
What to Serve with Customizable Mini Trifles?
Creating a delightful meal is all about those perfect pairings that elevate your dining experience to new heights.
- Freshly Brewed Coffee: The richness of hot coffee beautifully complements the sweet layers of the trifles, making for a warm, comforting ending to your meal.
- Vanilla Ice Cream: A scoop of creamy vanilla ice cream adds a decadent touch, pairing lusciousness with the bright flavors of the berries.
- Chocolate Tart: The deep cocoa notes of a chocolate tart create a divine contrast, balancing the sweetness of your trifles with a touch of richness.
- Fruit Salad: A refreshing bowl of seasonal fruit salad brings brightness and complements the trifles with additional layers of texture and flavor.
- Mint Tea: The subtle coolness of mint tea is a soothing choice, providing a refreshing cleanse for the palate after indulging in such sweetness.
- Cheese Platter: Offering a variety of cheeses with nuts and dried fruits creates a savory balance, turning your meal into a sophisticated experience.
- Custard Cups: Keeping the theme alive, serve small cups of additional custard for those who can’t get enough of that creamy goodness.
- Sparkling Water: Lightly flavored sparkling water adds a refreshing fizz, counteracting the sweetness while enhancing the overall experience of your dessert.
- Lemon Bars: A tangy lemon bar introduces a zesty kick, making for a bright, vibrant pairing with the sweetness of the mini trifles.
- Chocolate Covered Strawberries: These delightful bites bridge the flavors perfectly while visually enhancing your table—ideal for a truly indulgent dessert spread!
Expert Tips for Mini Trifles
• Cool Custard First: Allow the custard to cool completely before layering; this prevents the sponge from becoming soggy.
• Layer Wisely: Alternate layers of custard and jelly with fresh berries, ensuring even distribution for a beautiful presentation.
• Garnish to Impress: Top with extra berries or a dollop of whipped cream before serving; it adds elegance and freshness to your mini trifles.
• Mix It Up: Don’t hesitate to experiment with different flavored creams or jellies based on the season for unique twists on your mini trifles.
• Storage Success: Store assembled trifles in airtight containers in the refrigerator for up to 2-3 days for optimal freshness.
Make Ahead Options
These customizable mini trifles are perfect for meal prep enthusiasts looking to save time during busy weeks! You can prepare the creamy custard and jelly layers up to 24 hours in advance and store them in airtight containers in the refrigerator. Additionally, the sponge cake or cookies can be prepared and stored for up to 3 days to maintain their freshness. Simply assemble the trifles within a few hours of serving for the best texture, layering the custard, jelly, and fresh berries just before you gather around the table. Keep in mind, it’s essential to chill the assembled trifles for at least 2 hours before serving to allow flavors to meld beautifully—these layers will be just as delicious, giving you stunning desserts with minimal effort!
Mini Trifles Customization Options
Feel free to let your creativity run wild with these mini trifles and make them uniquely yours!
-
Dairy-Free: Use coconut cream or dairy-free pudding as a custard substitute for a rich, non-dairy option. Enjoy the tropical twist that coconut adds!
-
Gluten-Free: Swap out the sponge cake for gluten-free ladyfingers or crushed gluten-free cookies. This ensures everyone can indulge without worry.
-
Seasonal Fruits: Replace fresh berries with seasonal favorites like peaches in summer or apples and cinnamon in fall for a delightful change.
-
Chocolate Lovers: Incorporate chocolate pudding instead of custard for a decadent chocolate layer. Add chocolate shavings on top for an extra treat!
-
Flavored Jellies: Experiment with mango or raspberry jellies for a burst of tropical or tart flavor, creating a new dimension to every bite.
-
Nutty Crunch: For added texture, sprinkle crushed nuts or granola between layers. It adds a delightful crunch that contrasts beautifully with the creaminess.
-
Non-Alcoholic Options: Opt for flavored syrups like raspberry or vanilla in place of any alcohol in gelatins, ensuring everyone can enjoy without concern.
-
Fancy Garnishes: Top your trifles with a drizzle of chocolate sauce or caramel for a sweet finish, giving each serving an irresistible allure.
Taking the time to explore these variations can lead to some truly memorable mini trifles that will be the talk of the table! And if you’re searching for more dessert inspiration, why not try my Christmas Mini Cookies next for another fun twist on sweet treats?
Mini Trifles Recipe FAQs
How do I choose ripe fruits for my mini trifles?
Absolutely! When selecting fresh berries, look for ones that are plump, firm, and vibrant in color. Strawberries should be bright red without any dark spots, while blueberries should be deep blue and slightly shiny. If you’re opting for seasonal fruits, like peaches or apples, ensure they’re fragrant and yield slightly under pressure. Avoid any fruits with bruises or mold to guarantee the best flavor in your trifles!
What’s the best way to store mini trifles?
You can store your lovely mini trifles in airtight containers in the refrigerator for up to 2-3 days. Just make sure they’re well-sealed to maintain their freshness and prevent any odors from seeping in. They make a perfect make-ahead dessert, allowing the flavors to meld beautifully, so don’t hesitate to prepare them in advance for gatherings!
Can I freeze components of my mini trifles?
Very! While it’s generally not advisable to freeze assembled mini trifles due to potential textural change in the layers, you can freeze each component separately. For the custard, place it in a freezer-safe container, ensuring it’s cooled first. It can be frozen for up to 3 months. For jelly, use a freezer-safe bag or container, and it will last the same duration. Just thaw in the refrigerator overnight before assembling your trifles again!
What should I do if my custard isn’t thickening?
If your custard isn’t coming together in that delicious thick texture, don’t worry! Make sure you’re whisking gently over low heat and allow it at least 10-15 minutes to thicken. If it’s still runny after that, you can whisk in an additional tablespoon of cornstarch dissolved in a bit of milk or cream to help it set. Keep stirring until it thickens to your liking, and let it cool completely before layering.
Are there any dietary considerations I should keep in mind?
Yes! If you’re accommodating dietary restrictions, consider using lactose-free milk or cream for the custard and whipped cream for a dairy-free option. For gluten sensitivities, substitute the sponge cake with gluten-free alternatives or crushed gluten-free cookies. Always ensure your fruits are washed thoroughly, especially if you have allergies. When serving to pets, keep the berries in moderation as some fruits like grapes can be harmful to dogs.
How can I ensure my cake layers don’t get soggy?
To avoid soggy layers, allow your custard to cool completely before layering. I often let my sponge cake sit out briefly to dry out a bit before assembly. Also, layer your components wisely by putting a thin layer of jelly between the custard and cake, creating a barrier that helps maintain that delightful texture. Arrange the layers carefully to keep everything structured and visually appealing!

Irresistible Mini Trifles: Layered Delights for Every Occasion
Ingredients
Equipment
Method
- In a medium saucepan, whisk together your custard ingredients over low heat. Stir gently for about 10-15 minutes until the mixture thickens enough to coat the back of a spoon. Remove from heat and let it cool completely before using.
- While the custard cools, prepare your jelly according to the package instructions. Allow it to cool at room temperature until slightly thickened, about 20 minutes.
- Grab clear cups or jars to showcase those beautiful layers. Start by placing a spoonful of sponge cake or crushed cookies at the bottom, pressing slightly for a firm base. Add a layer of the creamy custard, followed by the jelly, and then a handful of fresh berries. Repeat the layering process until nearly full, finishing with a dollop of custard and berries on top.
- Once assembled, cover your mini trifles and refrigerate them for at least 2 hours to allow the flavors to meld and set the jelly layer.
- When ready to serve, remove them from the refrigerator and consider garnishing with additional fresh berries or a swirl of whipped cream on top.
Leave a Reply