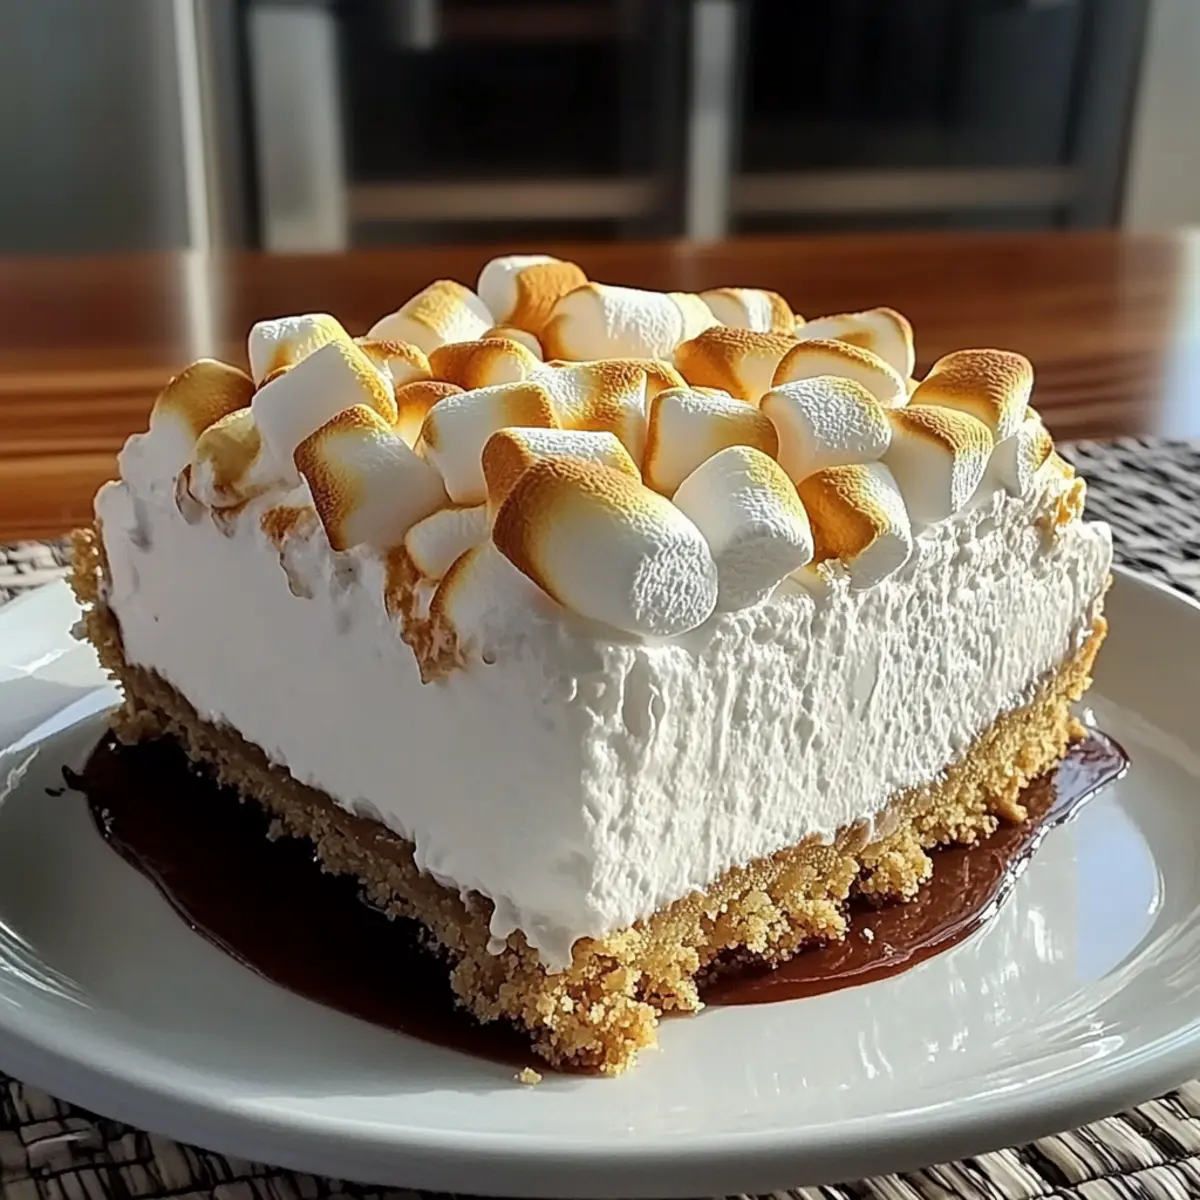
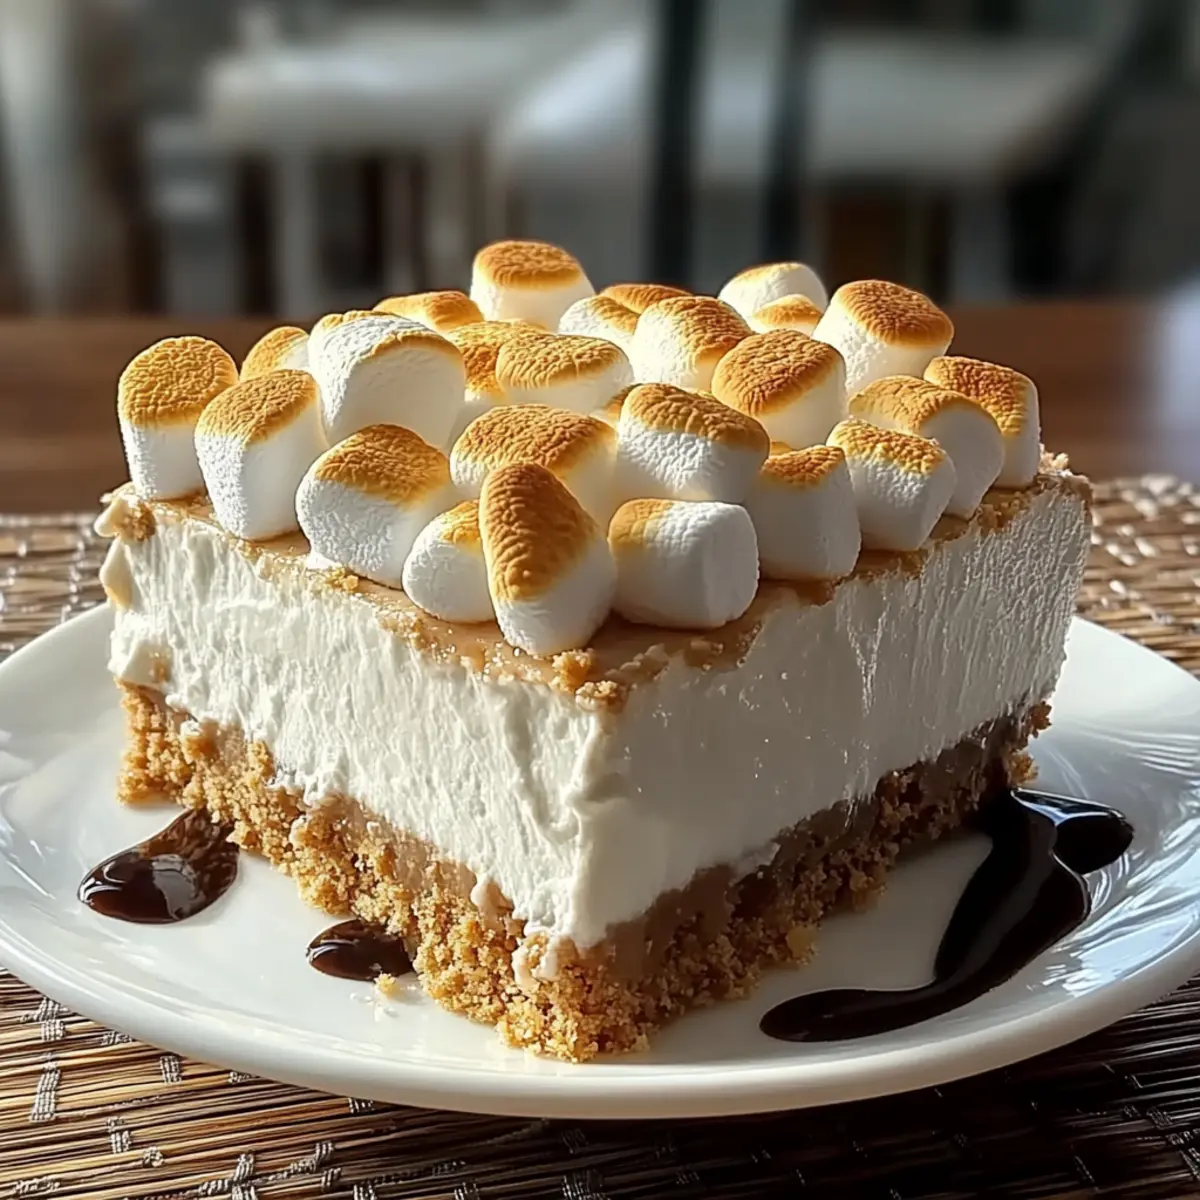
As I stood in my kitchen, the summer sun streaming through the windows, I was craving something sweet but didn’t want to heat up my home. Enter the No-Bake Marshmallow Cheesecake—my go-to dessert that’s as refreshing as a cool breeze on a hot day. This easy summer treat combines the fluffy sweetness of marshmallows with the rich tang of cream cheese, all resting on a buttery graham cracker crust. What’s more, it’s a crowd-pleaser that doesn’t require an oven, making it the perfect recipe for those lazy summer afternoons. Whether you’re hosting friends or simply indulging after a long day, this no-bake cheesecake is sure to impress. Are you ready to dive into making this delightful dessert?
Why is this cheesecake so delightful?
Effortless to make, this No-Bake Marshmallow Cheesecake requires minimal time in the kitchen, allowing you to focus on enjoying summer. Surprisingly light, the airy texture of the filling makes it an excellent choice for warm days. Versatile at heart, feel free to add fresh fruits or swap graham crackers for Oreos, appealing to all taste buds. Impressive yet easy, this dessert is bound to wow your guests, like my Strawberry Cream Cheesecake or the indulgent Bake Biscoff Cheesecake. Quick to chill, and perfect for make-ahead prep, you’ll find it’s a sweet treat you’ll want to return to!
No-Bake Marshmallow Cheesecake Ingredients
For the Crust
• Graham Crackers – Essential for the base structure; swap in Oreos for a chocolatey twist.
• Unsalted Butter – Binds the crumbs together for a rich crust; margarine can serve as a replacement.
For the Filling
• Mini Marshmallows – Infuses fluffy sweetness into the cheesecake; larger marshmallows may be chopped as a substitute.
• Whole Milk – Helps melt the marshmallows into a smooth mixture; consider almond or oat milk for a dairy-free version.
• Cream Cheese – Provides richness and tang; low-fat cream cheese could result in a softer texture.
• Vanilla Extract – Elevates the flavor profile; almond extract can be an optional alternative.
• Heavy Cream – Whipped to stiff peaks for airy texture; light cream could be a lower-fat substitute.
Enjoy making your No-Bake Marshmallow Cheesecake—a delightful easy summer treat bursting with flavor!
Step‑by‑Step Instructions for No-Bake Marshmallow Cheesecake
Step 1: Prepare the Crust
Start by crushing 2 cups of graham crackers into fine crumbs using a food processor or a zip-top bag with a rolling pin. Mix the crumbs with ½ cup of melted unsalted butter until combined. Press this mixture firmly into the base of a 9-inch springform pan to form a solid crust. Chill in the refrigerator for about 30 minutes to set while you prepare the filling.
Step 2: Melt the Marshmallows
In a medium saucepan over low heat, combine 2 cups of mini marshmallows with ⅓ cup of whole milk. Stir continuously until the marshmallows are completely melted and the mixture is smooth, which should take about 5–7 minutes. Once smooth, remove from heat, and allow it to cool slightly while you prepare the cream cheese.
Step 3: Combine the Cream Cheese
In a mixing bowl, beat 8 ounces of softened cream cheese with an electric mixer until it’s creamy and smooth, about 2 minutes. Gradually mix in 1 teaspoon of vanilla extract. Then, slowly pour in the cooled marshmallow mixture, combining everything until it’s fully blended and smooth, ensuring no lumps remain.
Step 4: Whip the Heavy Cream
In a separate bowl, whip 1 cup of heavy cream using a hand mixer or stand mixer until stiff peaks form, approximately 3–5 minutes. The cream should hold its shape when the beaters are lifted. Gently fold this whipped cream into the marshmallow-cream cheese mixture using a spatula until well combined, creating a light and airy filling.
Step 5: Chill the Cheesecake
Pour the airy filling into the prepared graham cracker crust, smoothing the top with a spatula to ensure an even surface. Cover the cheesecake with plastic wrap or foil, then refrigerate for at least 4 hours, but overnight is ideal for the best texture. The No-Bake Marshmallow Cheesecake will firm up beautifully during this time.
How to Store and Freeze No-Bake Marshmallow Cheesecake
Fridge: Store your cheesecake covered in the refrigerator for up to 4 days. Ensure it’s tightly wrapped to maintain freshness and prevent drying out.
Freezer: For longer storage, freeze the cheesecake for up to 2 months. Wrap it well in plastic wrap and then in aluminum foil, ensuring no air gets in.
Thawing: When ready to enjoy, simply transfer the frozen cheesecake to the fridge and let it thaw overnight for the best texture and flavor.
Reheating: There’s no need to reheat this no-bake marshmallow cheesecake; serve it chilled directly from the fridge for optimal enjoyment!
No-Bake Marshmallow Cheesecake Variations
Feel free to get creative with this No-Bake Marshmallow Cheesecake and customize it to your heart’s delight!
-
Chocolate Oreo Crust: Replace the graham crackers with crushed Oreos for a deliciously rich chocolate crust. The twist adds a decadent layer that chocolate lovers will adore.
-
Fruity Surprise: Fold in diced fruits like strawberries or blueberries into the filling for a burst of fresh flavor. The combination of tangy fruit with the sweet marshmallow filling creates a delightful balance.
-
Almond Extract: Swap the vanilla extract for almond extract for a unique flavor twist. This subtle aroma will take your cheesecake to new heights and elevate every bite.
-
Nutty Crunch: Add chopped nuts like almonds or pecans to the crust for added texture. The extra crunch is a delightful contrast to the creamy filling.
-
Lightened Up: For a lower-fat option, substitute light cream for heavy cream and use low-fat cream cheese. This way, you’ll enjoy the creamy goodness without the guilt.
-
Mint Chocolate: Incorporate a few drops of peppermint extract and top with chocolate shavings for a refreshing mint chocolate version. This variation brings a cool twist, making it a unique dessert option.
-
Spicy Kick: Mix in a pinch of cayenne or chili powder to the filling for a surprising heat that complements the sweetness beautifully. This zest will be a conversation starter among your guests!
-
Mini Cheesecake Bites: Pour the filling into mini graham cracker crusts for individual-sized cheesecakes. Perfect for parties or gatherings when you want to wow your friends and family with adorable bite-sized treats.
Don’t forget to check out my Strawberry Cheesecake Protein Balls for more creative uses of cheesecake flavors! Each variation will offer its own unique flavor profile, enhancing your dessert experience while keeping that classic no-bake charm.
Expert Tips for No-Bake Marshmallow Cheesecake
-
Choose Quality Cream Cheese: Use full-fat cream cheese for a creamier texture. Low-fat options can lead to a runny filling that doesn’t hold its shape well.
-
Cool the Mixture Well: Before combining the melted marshmallow with cream cheese, ensure it’s cooled properly. If it’s too hot, it can cause the cream cheese to melt and lose its body.
-
Overnight Refrigeration: For the best results, refrigerate the cheesecake overnight. This allows the filling to set properly, making slicing much easier and creating a perfect creamy texture.
-
Whip Cream to Stiff Peaks: Be sure to whip the heavy cream until stiff peaks form. This is essential for achieving the light and airy filling that makes the no-bake marshmallow cheesecake irresistible.
-
Customizable Variations: Don’t hesitate to play around with flavors! Diced fruits or flavored extracts can be added for a personal touch. Just remember that transitions in taste can alter the overall balance, so adjust accordingly.
Make Ahead Options
These No-Bake Marshmallow Cheesecakes are perfect for meal prep enthusiasts! You can prepare the graham cracker crust up to 24 hours in advance by pressing it into the springform pan and refrigerating it tightly covered. The filling can also be mixed and stored separately in the refrigerator for up to 3 days; just make sure to cover it properly to prevent it from absorbing any odors. When you’re ready to serve, simply pour the chilled filling into the prepped crust and refrigerate for a minimum of 4 hours or ideally overnight until set. This way, you’ll have a delightful dessert ready with minimal last-minute fuss, making it an effortless option for busy weeknights or gatherings!
What to Serve with No-Bake Marshmallow Cheesecake
Elevate your dessert experience with irresistible pairings that complement the fluffy sweetness of this dreamlike cheesecake.
-
Fresh Berries: Juicy strawberries or blueberries add a tart contrast, enhancing the sweetness of the cheesecake.
-
Whipped Cream: A dollop of fresh whipped cream adds an airy touch that mirrors the cheesecake’s light texture.
-
Chocolate Sauce: Drizzle rich chocolate sauce over the cheesecake for a decadent twist that enriches the flavors.
-
Mint Leaves: A sprinkle of fresh mint adds a refreshing burst, balancing the dessert’s sweetness beautifully.
-
Coffee: Enjoy a cup of brewed coffee alongside your cheesecake; the bitterness perfectly offsets the creamy sweetness.
-
Sparkling Lemonade: The bright and bubbly nature of lemonade provides a fizzy palate cleanser between bites, enhancing the summer vibes.
-
Chocolate Dipped Strawberries: These indulgent bites bring together juicy fruit and rich chocolate for a perfect pairing.
-
Caramel Sauce: A drizzle of warm caramel sauce will introduce a sweet, buttery flavor that elevates the whole experience.
-
Toasted Coconut: Sprinkle toasted coconut on top of your cheesecake for a delightful crunch and a hint of tropical flair.
-
Ice Cream: A scoop of vanilla ice cream alongside the cheesecake creates a wonderfully creamy duo, perfect for warm days.

No-Bake Marshmallow Cheesecake Recipe FAQs
How do I choose ripe ingredients for this cheesecake?
Absolutely! For the best results, make sure your cream cheese is softened to room temperature for easy mixing. If you’re using fresh fruits for garnish, look for blemish-free berries that are firm but give slightly when squeezed. This indicates ripeness and sweetness.
What are the best storage methods and duration for this cheesecake?
Store your No-Bake Marshmallow Cheesecake covered in the refrigerator for up to 4 days. Tightly wrap it to maintain freshness and prevent drying out. If you’re making it ahead of time, it’s a great idea to prepare it a day or two before your gathering!
Can I freeze the No-Bake Marshmallow Cheesecake?
Certainly! For longer storage, you can freeze it for up to 2 months. First, wrap the cheesecake tightly in plastic wrap, ensuring there’s no air exposure, followed by a layer of aluminum foil. When you’re ready to enjoy it, simply transfer it to the fridge and let it thaw overnight for a smooth texture.
What should I do if the filling doesn’t set properly?
If your cheesecake filling isn’t setting the way you’d like, it may be due to not whipping the heavy cream to stiff peaks or combining the warm marshmallow mixture with cream cheese too soon. For troubleshooting, try refrigerating for an additional hour or so to help firm it up. If it’s still too soft, consider placing it in the freezer for 15-20 minutes before serving to help it hold its shape.
Are there any dietary considerations for this recipe?
Very! This No-Bake Marshmallow Cheesecake is vegetarian friendly, making it a lovely dessert for many. However, keep in mind that it contains dairy, so if you have lactose intolerance or dairy allergies, swap the cream cheese for a dairy-free alternative and use almond or oat milk instead. Always check your marshmallow brand as some may contain gelatin from animal sources.

Indulge in No-Bake Marshmallow Cheesecake Bliss Today
Ingredients
Equipment
Method
- Crush 2 cups of graham crackers into fine crumbs and mix with ½ cup melted unsalted butter. Press into base of a 9-inch springform pan and chill for 30 minutes.
- Combine 2 cups of mini marshmallows and ⅓ cup whole milk in a saucepan. Stir over low heat until smooth, about 5-7 minutes. Cool slightly.
- Beat 8 ounces of cream cheese until creamy. Mix in 1 teaspoon vanilla extract and slowly pour in marshmallow mixture, blending until smooth.
- Whip 1 cup of heavy cream until stiff peaks form. Gently fold into the marshmallow-cream cheese mixture.
- Pour filling into crust and smooth the top. Cover and refrigerate for at least 4 hours, preferably overnight.
Leave a Reply