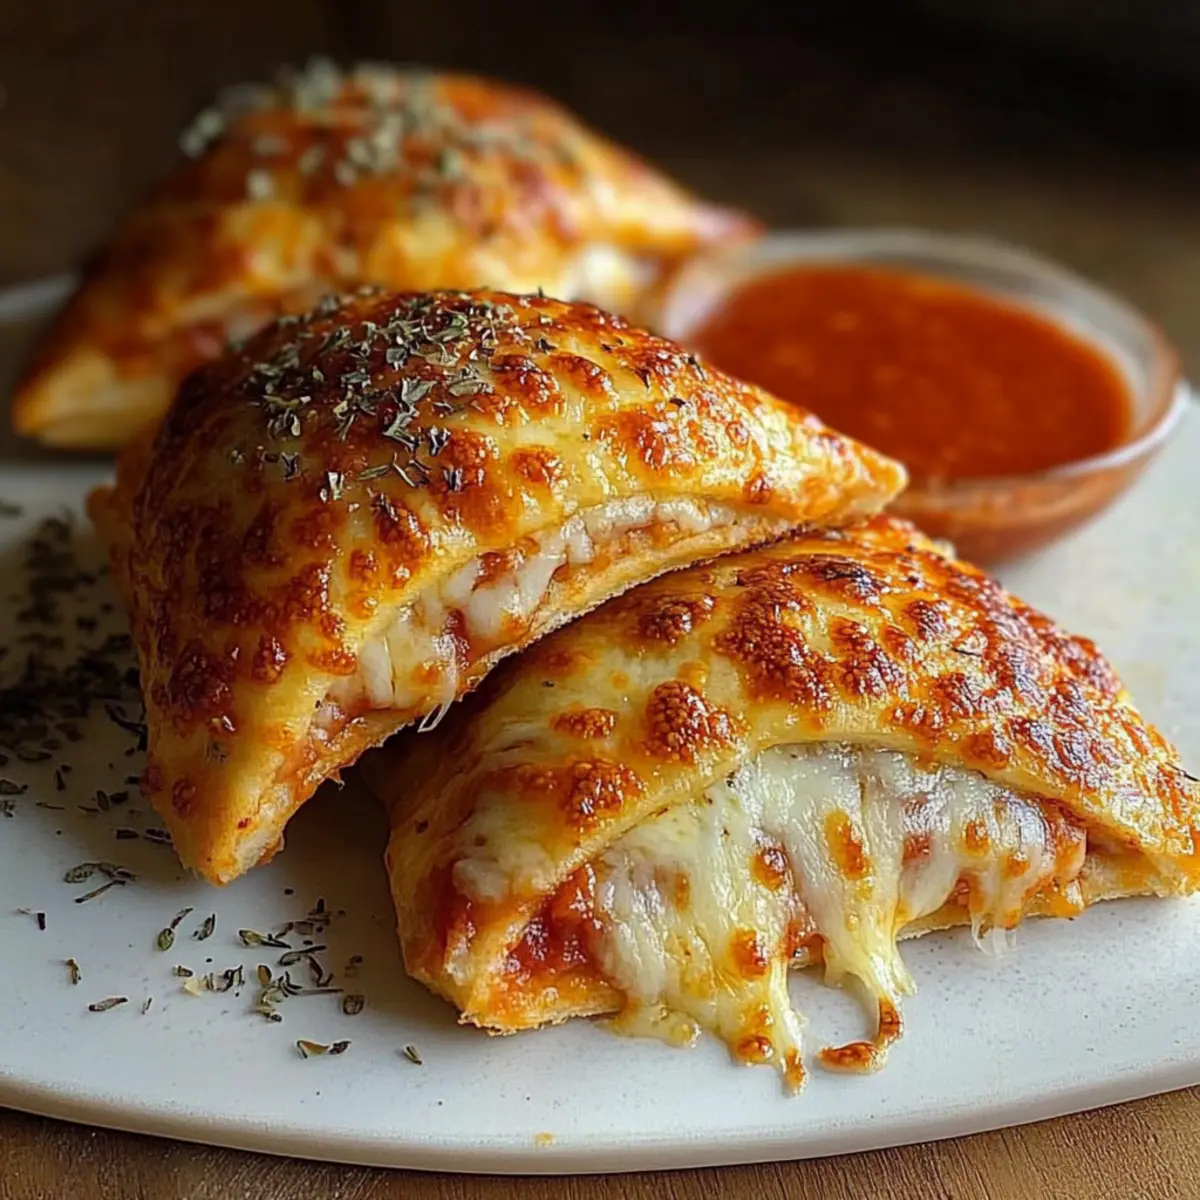
“Does anything beat the joy of biting into a crispy, golden pizza pocket that’s packed with gooey mozzarella and your favorite toppings? Trust me, when I first discovered this Homemade Easy Cheesy Pizza Pockets Recipe, it was an instant kitchen victory! In just 30 minutes, you can whip up this delightful snack that’s not only a hit with family and friends but also versatile enough to satisfy every craving. Imagine the comforting aroma of Italian seasonings filling your home while you play with endless filling options, from pepperoni to hearty vegetables—there’s something here for everyone! What tasty twist will you create with your pizza pockets today?”
Why Are These Pizza Pockets So Irresistible?
Ultimate Comfort Food: There’s nothing quite like the sensation of biting into a warm, cheesy pocket filled with vibrant flavors. Quick and Easy: Whipping up these Homemade Easy Cheesy Pizza Pockets takes only 30 minutes, making it the perfect solution for busy weeknights or last-minute gatherings. Customizable: With various filling options, from classic pepperoni to vegetarian delights, everyone can enjoy their favorite combination. Crowd-Pleasing: Whether it’s a game day snack or a casual family dinner, these pizza pockets are sure to impress. Pair them with a simple green salad or a side of marinara sauce for dipping—your taste buds will thank you!
Homemade Easy Cheesy Pizza Pockets Ingredients
For the Dough
- Pizza Dough – This provides structure and crispiness; opt for homemade for the most flavorful result.
For the Filling
- Shredded Mozzarella – A classic choice that adds creaminess; substitute with dairy-free cheese for a vegan option.
- Toppings (e.g., pepperoni, bell peppers, mushrooms) – Customize to your liking; mix and match for endless flavor possibilities!
For the Finishing Touches
- Olive Oil – Enhances the golden color and flavor of the crust; can be replaced with melted butter for extra richness.
- Italian Seasoning – Offers aromatic herbal notes; substitute with oregano and basil if needed.
- Fresh Basil/Parmesan (optional) – Adds a layer of freshness and flavor after baking—definitely worth it!
These Homemade Easy Cheesy Pizza Pockets are not only delicious but also a fun project in the kitchen. Enjoy the process of crafting your own delightful snacks!
Step‑by‑Step Instructions for Homemade Easy Cheesy Pizza Pockets Recipe
Step 1: Preheat the Oven
Begin by preheating your oven to 400°F (200°C). While the oven heats up, line a baking sheet with parchment paper to ensure your Homemade Easy Cheesy Pizza Pockets don’t stick. This prepping step is key for achieving a deliciously crispy crust, so don’t skip it!
Step 2: Roll Out the Dough
On a lightly floured surface, roll out your pizza dough until it’s about 1/8 inch thick. Use a pizza cutter or sharp knife to cut the dough into 4×4 inch squares, which will serve as the base for your pockets. Keep the pieces uniform for even cooking and that perfect balance of crunch and chewiness!
Step 3: Add the Cheese and Toppings
Take the dough squares and place a generous amount of shredded mozzarella in the center of each one. Don’t hold back—this is what makes your Homemade Easy Cheesy Pizza Pockets so indulgent! Now, add your desired toppings, such as pepperoni or bell peppers, ensuring you don’t overfill to avoid spillage later on.
Step 4: Form the Pockets
Gently fold the dough over to create a pocket, enclosing the filling inside. Use the tines of a fork to press and seal the edges firmly. This step is essential to keep the cheesy goodness inside while baking, so make sure the seal is tight for your pizza pockets to hold their shape.
Step 5: Brush and Season
Once the pockets are sealed, brush the tops with a light coating of olive oil. This will give them a beautiful golden-brown hue as they bake. Sprinkle Italian seasoning generously over the tops for an aromatic flavor boost, complementing the cheesy filling in your Homemade Easy Cheesy Pizza Pockets.
Step 6: Bake to Perfection
Place your prepared baking sheet in the preheated oven and bake for 15-20 minutes. Keep an eye on them as they turn golden brown and the cheese melts; they should be beautifully crispy on the outside and warm inside. The sight of bubbling cheese will have you eagerly anticipating the first bite!
Step 7: Add Final Touches
Once baked, remove the pockets from the oven and let them cool for a few minutes. For an extra touch of flavor, consider sprinkling fresh basil or grated Parmesan cheese on top. This enhances your Homemade Easy Cheesy Pizza Pockets, making each bite even more delectable and inviting!

Make Ahead Options
These Homemade Easy Cheesy Pizza Pockets are a fantastic choice for meal prep, making your busy weeknights easier! You can prepare the pockets by assembling them and then refrigerating for up to 24 hours before baking—just cover them tightly in plastic wrap to maintain their freshness. Alternatively, you can freeze unbaked pockets by placing them on a baking sheet in a single layer to freeze individually, then transfer to a freezer bag where they’ll keep well for up to 3 months. When you’re ready to enjoy, simply bake from frozen, adding a few extra minutes to the cooking time. This way, you’ll have delicious, homemade snacks ready to go—ideal when you’re short on time!
Expert Tips for Homemade Easy Cheesy Pizza Pockets
-
Seal the Edges: Ensure a firm seal to prevent fillings from escaping during baking. A good seal keeps all that cheesy goodness inside!
-
Customize Wisely: Feel free to mix fillings, but avoid overstuffing to ensure they don’t burst open. Keep it balanced for your Homemade Easy Cheesy Pizza Pockets!
-
Baking Time Adjustments: If using gluten-free dough, check on them earlier as they may require less time to bake.
-
Chill Dough for Ease: If the dough gets too sticky while rolling, refrigerate it for a few minutes. This makes it easier to work with and shapes beautifully.
-
Make-Ahead Freezing: Prepare unbaked pockets, flash freeze them on a baking sheet, then transfer to bags for quick snacks later. Just bake straight from frozen, adding a few extra minutes!
What to Serve with Homemade Easy Cheesy Pizza Pockets
Looking to build a delightful meal around your crispy pizza pockets? Let’s explore some perfect pairings!
-
Fresh Green Salad: A light salad with mixed greens and a zesty vinaigrette balances the richness of the cheesy pockets. The crunch adds a refreshing contrast.
-
Marinara Sauce: Classic and comforting, marinara serves as a delicious dip that enhances the pizza flavors, creating a nostalgic pizzeria experience at home.
-
Garlic Breadsticks: Soft, buttery breadsticks seasoned with garlic make an irresistible accompaniment, perfect for soaking up extra marinara or enjoying on their own.
-
Veggie Platter with Hummus: Crisp veggies like carrots, cucumbers, and bell peppers with creamy hummus offer a healthy, crunchy counterpoint to the savory pockets, making it a colorful appetizer.
-
Fruit Salad: Bright, juicy fruit adds a sweet touch to your meal. Think strawberries, melons, and citrus—it’s a refreshing contrast that will brighten up the table.
-
Italian Soda: Effervescent and sweet, Italian sodas are a fun beverage that pairs beautifully with cheesy flavors, offering a refreshing sip that cleanses the palate.
-
Chocolate Chip Cookies: End your meal on a sweet note! Freshly baked cookies provide a comforting touch that kids and adults alike will love, making the dining experience feel special.
How to Store and Freeze Homemade Easy Cheesy Pizza Pockets
Fridge: Store any leftovers in an airtight container for up to 3 days. Reheating in the oven is best for maintaining crispness.
Freezer: For longer storage, freeze unbaked pockets individually. Once frozen, transfer them to a zip-top bag for up to 3 months.
Reheating: Bake frozen pockets directly from the freezer for 20-25 minutes at 400°F (200°C), or until golden and heated through.
Room Temperature: If serving at a party, keep homemade pizza pockets at room temperature for up to 2 hours, but they’ll be best enjoyed warm!
Homemade Easy Cheesy Pizza Pockets Variations
Feel free to get creative and personalize these pizza pockets to match your cravings or dietary needs!
- Gluten-Free: Use a gluten-free pizza dough recipe to accommodate gluten sensitivities without sacrificing flavor or fun.
- Veggie-Packed: Swap in a mix of sautéed vegetables like spinach, zucchini, and bell peppers for a nutritious twist.
- Spicy Kick: Add sliced jalapeños or a sprinkle of crushed red pepper into the filling for a zesty pop of heat.
- Sweet Dessert Pockets: Try substituting the pizza dough with sweet pastry and filling it with chocolate chips or fresh berries for a delightful dessert option.
- Cheese Lovers’ Blend: Combine mozzarella with provolone or gouda to create a rich, layered cheese experience that’ll elevate any bite.
- Italian Sausage: Replace the pepperoni with crumbled, cooked Italian sausage for a hearty filling that packs a flavorful punch.
- Herbed Delight: Mix chopped fresh herbs, like basil and oregano, into your filling for an aromatic upgrade that transports you straight to Italy.
- Marinara Dip: Serve your pockets with a side of warm marinara sauce for dipping, amplifying the classic pizza flavor with every bite.
Experimenting with these variations will take your Homemade Easy Cheesy Pizza Pockets to the next level. Whether you prefer a classic approach or something uniquely yours, the possibilities are as endless as your imagination! For a cozy night in, consider pairing these with a simple salad or even a batch of Chicken Noodle Casserole for a delicious family-friendly feast!

Homemade Easy Cheesy Pizza Pockets Recipe FAQs
What type of pizza dough should I use?
You can use store-bought pizza dough for convenience, but I highly recommend making it at home for the best flavor and freshness. If you prefer a gluten-free option, many gluten-free pizza dough mixes are available that work wonderfully for this recipe.
How should I store leftover pizza pockets?
Store any leftover Homemade Easy Cheesy Pizza Pockets in an airtight container in the fridge for up to 3 days. To reheat and maintain their delightful crispiness, pop them back in the oven at 350°F (175°C) for about 10-15 minutes, until warmed through.
Can I freeze unbaked pizza pockets?
Absolutely! I often make a batch and freeze them. To do this, prepare your pizza pockets as directed but do not bake them. Instead, place them on a baking sheet lined with parchment paper and freeze individually for about 1-2 hours. Once firm, transfer them to a zip-top freezer bag and they’ll stay good for up to 3 months. When you’re ready to enjoy, bake straight from frozen for 20-25 minutes at 400°F (200°C).
What if my pizza pockets leak filling while baking?
If you find that your pizza pockets are leaking, it usually means that the edges weren’t sealed tightly enough. To prevent this in the future, make sure to press the edges firmly with a fork and check for any small holes in the dough where cheese might escape. If they do leak, don’t worry too much—just enjoy the crispy bits that will be delicious, too!
Are these pizza pockets suitable for kids with allergies?
If you’re catering to specific dietary needs, you can modify the ingredients to accommodate allergies. Make sure to use gluten-free dough if necessary, and consult ingredient labels for pre-packaged goods like cheese and toppings to ensure they are allergen-free. There are also vegan cheese options that are suitable for those with dairy allergies.

Homemade Easy Cheesy Pizza Pockets Recipe for Ultimate Comfort Food
Ingredients
Equipment
Method
- Preheat your oven to 400°F (200°C) and line a baking sheet with parchment paper.
- Roll out your pizza dough on a lightly floured surface until 1/8 inch thick and cut into 4x4 inch squares.
- Place a generous amount of shredded mozzarella in the center of each dough square, then add your desired toppings.
- Fold the dough over to create a pocket and use a fork to press and seal the edges.
- Brush the tops with olive oil and sprinkle with Italian seasoning.
- Bake in the preheated oven for 15-20 minutes until golden brown and the cheese is melted.
- Remove from the oven and let cool for a few minutes; sprinkle with fresh basil or grated Parmesan before serving.
Leave a Reply